


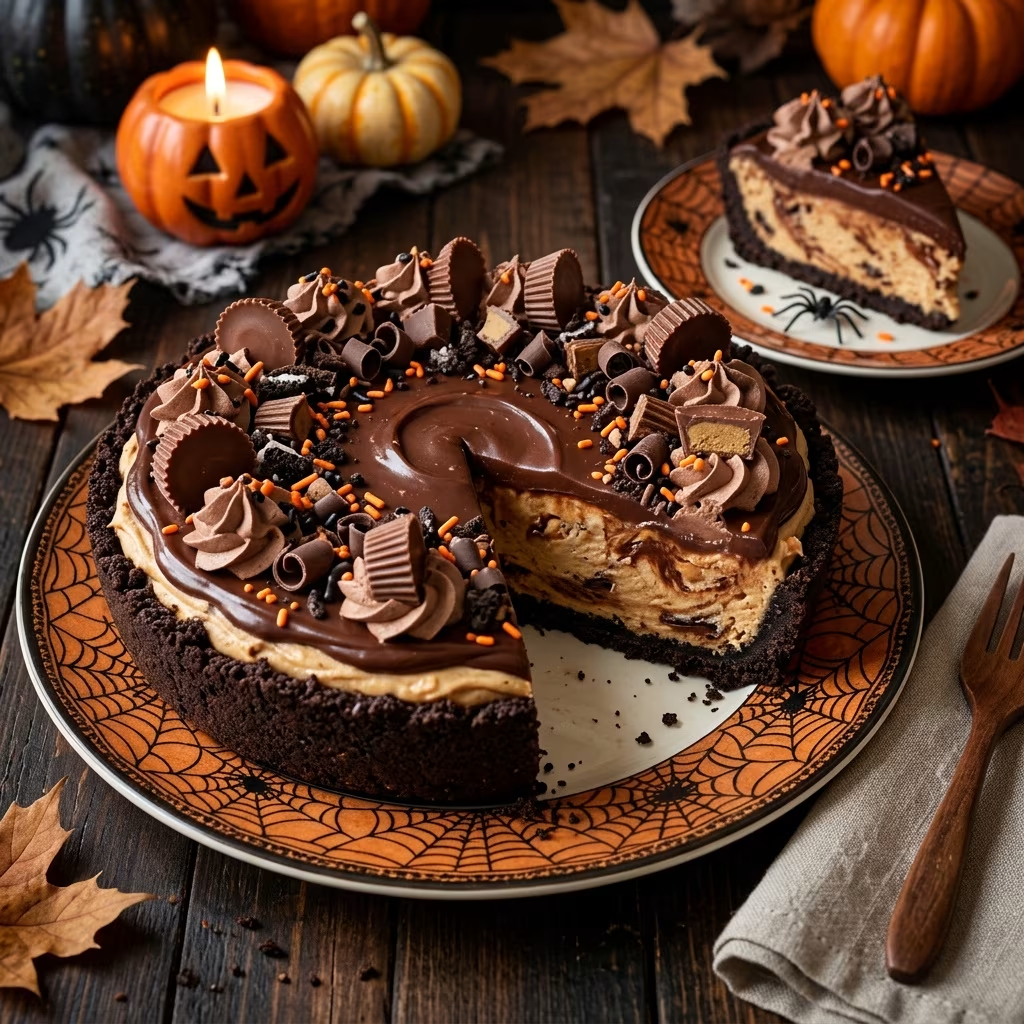
Overview: A Monstrously Good Halloween Dessert
If you’re looking for a dessert that captures the playful spirit (and irresistible sweetness) of Halloween, this Peanut Butter Cup Pie is your ultimate showpiece. Inspired by the iconic candy loved by kids and adults alike, this no-bake pie combines a crunchy chocolate cookie crust, a decadently creamy peanut butter filling, and festive toppings ranging from chopped peanut butter cups to fun Halloween candies. Whether you’re hosting a party or just want to treat yourself, this pie packs all the celebratory decadence, no oven required.
Why This Pie Steals the Show
- No-bake: Perfect for busy holidays—skip the oven and save kitchen space.
- Classic flavor combo: Chocolate and peanut butter, elevated by contrasting textures.
- Make-ahead friendly: Holds up beautifully in the fridge for hours before serving.
- Customizable decorations: Add Halloween treats or extra peanut butter cups for a personal touch.
- Family-friendly activity: Easy to assemble and fun to decorate with kids.
Ingredients and Substitutions
| Ingredient | Purpose | Substitutions |
|---|---|---|
| Chocolate Sandwich Cookies (e.g., Oreos) | Form the crust base | Chocolate graham crackers or other sandwich cookies |
| Unsalted Butter | Binds crust | Melted coconut oil for subtle flavor twist |
| Creamy Peanut Butter | Main flavor, creamy texture | Natural peanut butter (stirred and unsweetened; may affect firmness) |
| Cream Cheese | Adds tang and body | Neufchâtel or dairy-free cream cheese alternative |
| Powdered Sugar | Sweetens and thickens filling | Sifted confectioners’ sugar for smoothest texture |
| Whipped Topping (e.g., Cool Whip) | Lightens and aerates filling | Sweetened whipped cream (whipped to soft peaks) |
| Mini Peanut Butter Cups | Topping, mix-ins, decoration | Full-size cups chopped, other candy bars, or Halloween candy |
| Halloween Candy/Decorations | Festive garnish | Candy eyes, sprinkles, colored chocolate |
Step-by-Step Instructions
1. Make the Chocolate Cookie Crust
- Crush cookies: Place sandwich cookies in a food processor and pulse to fine crumbs. If you don’t have a processor, seal cookies in a plastic bag and crush with a rolling pin (some chunkiness is okay).
- Add melted butter: Drizzle melted unsalted butter over crumbs and mix until evenly combined.
- Form the crust: Press mixture firmly and evenly into the bottom and up the sides of a 9-inch pie plate. Use the flat bottom of a measuring cup for an even layer.
- Chill: Place the crust in the freezer or fridge to set for at least 15 minutes. No baking required for this recipe, but a quick bake (5–7 minutes at 350°F) gives a firmer crust if preferred.
2. Prepare the Peanut Butter Filling
- Beat cream cheese and peanut butter: In a large bowl, use an electric mixer or whisk to blend room-temperature cream cheese and peanut butter until completely smooth.
- Add powdered sugar: Mix in powdered sugar until well incorporated and filling thickens slightly.
- Fold in whipped topping: Gently fold in thawed whipped topping or fresh whipped cream. This step lightens the filling, creating the signature mousse-like texture. Avoid overmixing for the fluffiest result.
- Mix in chopped peanut butter cups: For extra bursts of chocolate and peanut butter, gently fold in about two-thirds of your chopped candy pieces.
3. Assemble the Pie
- Add filling to crust: Spoon peanut butter filling into the prepared cookie crust. Use a spatula to spread evenly, smoothing the top.
- Decorate: Sprinkle the rest of the peanut butter cups over the pie. For Halloween flair, add candy eyeballs, holiday sprinkles, or minis of your favorite spooky treats. If you want, drizzle melted chocolate over the top in a web or zigzag pattern for extra drama.
4. Chill and Serve
- Chill: Refrigerate pie for at least 2–4 hours, or until filing is fully set and sliceable. Overnight chilling works great for advance prep.
- Serve: For best results, slice with a clean, sharp knife (wipe off between cuts for neatest presentation). Pie is rich, so smaller slices are often perfect.
Tips and Tricks for Success
- Room temperature butter and dairy make for smooth mixing and no lumps.
- Don’t overfold the whipped topping—gentle folding keeps the filling fluffy.
- Chill thoroughly before serving for cleanest slices and best texture.
- Personalize the decorations: Add candy spiders, orange-and-black sprinkles, or piped chocolate webs for peak Halloween vibes.
- Store covered in the fridge for up to 3 days. The crust may soften slightly after day two but remains delicious.
Suggested Variations
- Crust swap: Use chocolate graham crackers, vanilla sandwich cookies, or gluten-free alternatives.
- Candy swap: Try chopped Halloween candy bars (Snickers, Twix, Kit Kat) or all-dark chocolate cups for extra richness.
- Add a salted caramel swirl to the filling or topping for added depth.
- Layered effect: Spread a thin layer of melted chocolate or ganache on the bottom crust before adding filling for added decadence.
Serving Ideas and Festive Halloween Presentation
This pie is ready-made for Halloween celebrations but can easily adapt to any occasion with a simple tweak of its decorations. Here are some fun ideas for a memorable holiday presentation:
- Create a spiderweb: Drizzle melted white or dark chocolate in circular rings and drag a toothpick from center outward to create the classic webbed pattern.
- Add edible googly eyes: Candy eyes placed atop each slice add instant personality.
- Sprinkle orange and black sprinkles: Turn the top of the pie into a confetti-strewn celebration.
- Arrange candy corn in a border: A ring of candy corn brings color and Halloween nostalgia.
- Mini peanut butter cups: Anchor each slice with a whole or halved peanut butter cup on top.
Nutritional Notes
Like most festive desserts, this pie is indulgent and meant for special occasions. Each slice is rich and satisfying, packed with peanut butter (healthy fats and protein, but also sugar) and plenty of chocolate. Moderation is key—and with such bold flavors, a small slice goes a long way.
Make-Ahead and Storage Instructions
- Make ahead: Assemble the pie fully (crust, filling, and decorations), then chill up to 24 hours in advance.
- Storage: Keep pie covered in the refrigerator for up to 3 days. The crust may lose a little crunch after 2 days but remains delicious.
- Freezing: You can freeze the whole pie or leftovers for up to 2 months. Wrap tightly in plastic wrap and foil. Thaw overnight in the refrigerator before serving.
Ingredient Highlights and Shopping Tips
- Peanut Butter: Classic creamy peanut butter delivers the richest, silkiest texture. Natural peanut butter (fully stirred) works but may produce a softer filling.
- Cream Cheese: Use regular, full-fat cream cheese for the creamiest filling. Low-fat options work but slightly alter the mouthfeel.
- Chocolate Sandwich Cookies: Standard chocolate sandwich cookies (Oreos) are best. Skip the double-stuffed varieties for optimal crust-to-cream ratio.
- Whipped Topping: Store-bought non-dairy whipped topping (Cool Whip) is classic, but you can whip your own sweetened cream for a more natural approach.
- Mini Peanut Butter Cups: The smaller size makes decorating simple, but standard cups chopped into pieces are just as festive.
Frequently Asked Questions (FAQs)
Q: Can I make this pie gluten-free?
A: Yes. Substitute gluten-free chocolate sandwich cookies for the crust and check all candy ingredients for gluten.
Q: Can I use homemade whipped cream instead of store-bought topping?
A: Absolutely. Use about 2 cups of heavy cream whipped with 2–3 tablespoons of sugar to soft peaks, then fold in as you would Cool Whip.
Q: My peanut butter filling looks too soft. What can I do?
A: Chill the filling thoroughly before cutting. Ensure you’ve used full-fat cream cheese, and avoid overmixing the whipped topping for best structure.
Q: How can I make this ahead for a party?
A: Assemble the entire pie and keep covered in the fridge for up to a day. Finish decorations with soft candies or chocolate right before serving if you’re concerned about color running or candy becoming sticky.
Q: Can I add a chocolate layer inside the crust?
A: Yes! Melt chocolate chips or ganache and spread a thin layer on the bottom of the chilled crust before adding the peanut butter mixture. Chill again to set before filling.
Q: Is this pie safe for peanut allergies?
A: No. For peanut-free versions, substitute sunflower seed butter and peanut-free chocolate candies, but always check for allergies before serving.
Recipe Summary
- Yield: 10–12 slices
- Prep time: 20 minutes
- Chill time: Minimum 2–4 hours
- Difficulty: Easy (no-bake)
Final Thoughts
Whether you’re throwing a Halloween party, treating trick-or-treaters, or just looking for a decadent dessert to mark the season, this Halloween Peanut Butter Cup Pie will satisfy every chocolate and peanut butter craving. Its ease of preparation and show-stopping appearance make it an annual favorite—and with a few tweaks, it transforms to fit any celebration year-round.
References
- https://simplyscrumptiouseats.com/easy-no-bake-reeses-peanut-butter-cup-pie/
- https://www.thepioneerwoman.com/food-cooking/recipes/a11761/another-pie/
- https://www.youtube.com/watch?v=qXdlCZwZa60
- https://www.youtube.com/watch?v=XGingaGGRbA
- https://cantstayoutofthekitchen.com/2020/01/01/reeses-peanut-butter-cup-pie/


