Loc Bow Tutorial: Turn Your Locs into a Joyful Statement Style
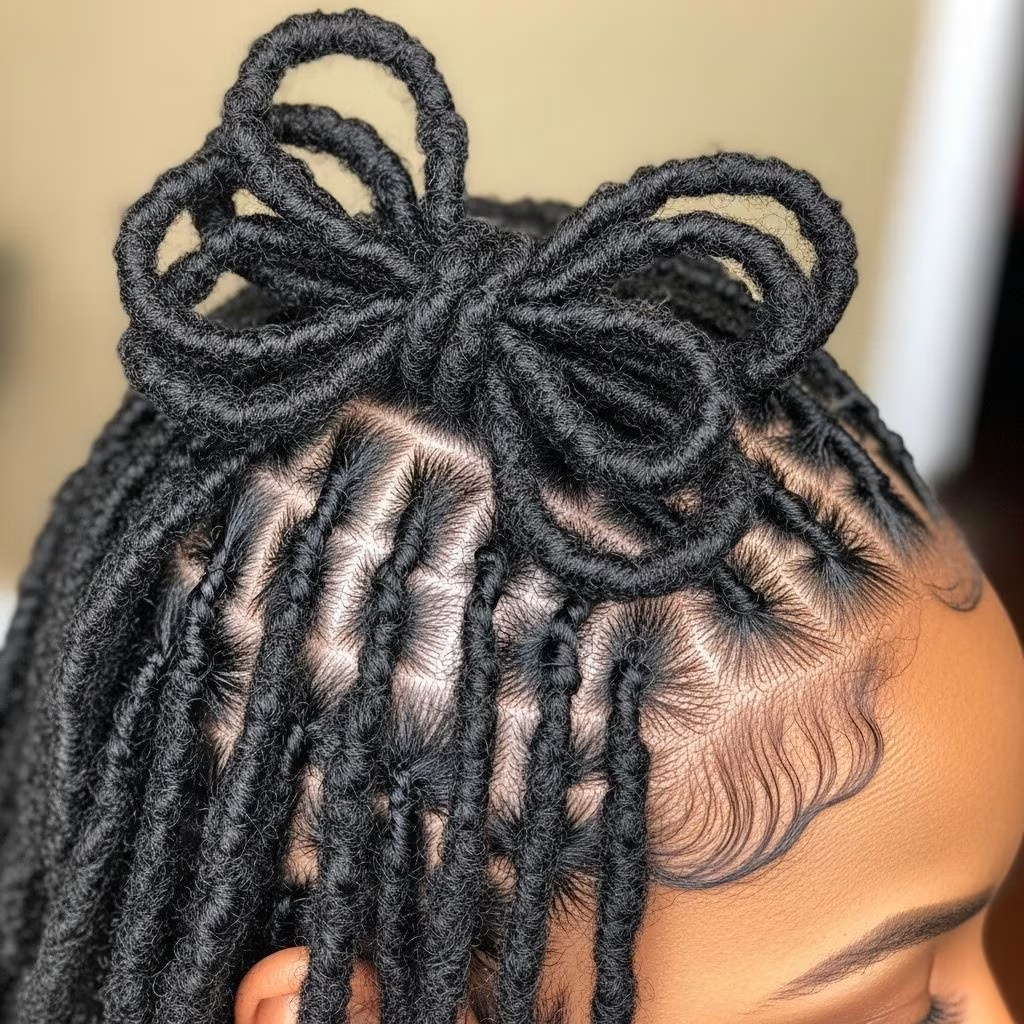
Among the many creative ways to style locs, the loc bow stands out as a playful, head-turning look that captures both elegance and whimsy. This tutorial demystifies each step involved in achieving the perfect loc bow, from preparing your locs to setting the final style in place. Whether you’re a devoted #TheBraidUp fan or simply wanting to add some chic fun to your hairstyle routine, read on for everything you need to know to master this viral look.
Why Everyone Loves the Loc Bow
During unpredictable times, it’s small moments of joy and creativity that lift spirits. For many, the simple pleasure of seeing an adorable loc bow on Instagram or in a beauty video is enough to brighten their day. The loc bow, as featured by Stasha Harris on Cosmopolitan’s The Braid Up, is designed to do just that—it’s cute, approachable, and totally DIY-friendly, making it perfect for at-home styling adventures.
Preparing Your Locs for the Bow
Before diving into shaping and securing your bow, preparation is key. Well-maintained, freshly retwisted locs create the best foundation for polished results.
- Retwist for Freshness: Begin by retwisting each loc to ensure your hair looks neat and uniform. Use a small amount—about dime-size—of edge control gel to tame flyaways and help hold each twist firmly in place.
- Edge Control Application: Apply gel starting at the top, twisting the loc clockwise until it’s super tight. Edge control is essential for a sleek finish.
Recommended products for this step include:
- Go Sleek Hair Edge Paste
- The Frontal Queen Baby Hair Control
- Hicks Total Transformations Edges Styling Gel
- Shine ’n Jam Magic Fingers for Braiders
Sectioning and Securing Your Locs
Organization and patience at this stage will make the actual bow formation much easier.
- Divide Your Locs: Section your locs into three groups—two larger groups on either side and a smaller section at the front. This division allows for ease in the bow-shaping process and keeps the proportions balanced.
- Hold with Clamps: Use hair clamps or clips to keep sections in place as you work. This prevents finished twists from getting in the way and ensures cleaner results.
Forming the Loc Bow
Now comes the creative part: shaping your locs into the bow itself. Follow these core steps:
- Fold and Shape: Take both larger side groups and fold them back toward the center of your head. Hold gently with one hand.
- Flip and Tuck: Take the front loc section and flip it back over; tuck its ends under or into the base of the bow, keeping the look as neat as possible. If loose ends stick out, don’t worry—they can be tucked in later.
- Fluff and Adjust: Adjust the shape of your bow until you’re happy with its size and fullness. Perfection isn’t necessary; the charm of the loc bow is in its character and softness.
Pro tip: If your locs are longer or thicker, experiment with how you fold and layer sections for a voluminous effect. For shorter locs, crown placement and careful pinning result in a more petite bow.
Sewing and Securing the Bow
A regular hair tie won’t hold the bow securely. For lasting results, sew the bow into place:
- Use Needle and Thread: After forming the bow, a few discreet stitches help keep the shape intact. Choose a thread color that matches your hair to blend seamlessly.
- Stitch Points: Sew at central points where the bow crosses to keep parts from unraveling or flopping as the day goes on.
Sewing adds a professional touch and ensures your style holds up through activity or even a full day out.
Setting Your Edges and Final Touches
Neat edges are key to a polished loc bow. Complete the look with these finishing steps:
- Wrap and Set: Place a scarf or wrap around your head (concentrating on the edges and base of your bow) for about 10 minutes. This sets the edge-control gel, keeping your hair sleek.
- Accessorize: Bring your personality to the look with beads, buttons, or pins at the center of the bow. Metallic accents or classic pearls add instant glamour.
- Final Adjustments: Check for any stray locs or flyaways. Tuck them under or secure with a small bobby pin if needed.
Expert Tips for Loc Bow Success
- Don’t rush the tucking process—patience yields the neatest finish.
- If you’re new to sewing hair, practice on a small section before tackling the full bow.
- Choose accessories that match your mood or outfit. Seasonal pins or playful charms make excellent focal points.
- Protective styling products help to maintain loc health and prevent breakage during sculpting.
Loc Bow Troubleshooting Guide
| Problem | Solution |
|---|---|
| Bow comes loose quickly | Increase number of stitches or use additional clamps before sewing. |
| Too many flyaways | Apply extra edge control and tuck individual locs with a tail comb. |
| Bow looks uneven | Re-section locs more evenly before folding; double check symmetry after fluffing. |
| Sensitive scalp/headache | Keep ponytail base loose and avoid excessive tension while twisting. |
Creative Variations of the Loc Bow
- Side Bow: Create the bow on one side for an asymmetrical look that feels flirty and modern.
- Double Bow: Make smaller bows on both sides of the head for playful symmetry.
- Half-up Bow: Use only the top section of locs for a subtle half-up, half-down style.
- Colorful Wraps and Threads: Integrate colored thread into the bow’s center or edges for pops of color.
Loc Bow Maintenance & Care
Keeping your loc bow fresh and intact can be simple. Here are the essentials:
- Nighttime Routine: Cover the bow with a satin or silk scarf before bed to reduce friction and preserve shape.
- Moisturizing: Lightly mist your locs with leave-in conditioner or natural oils to maintain softness.
- Quick Touch-ups: If edges start to loosen, reapply edge control to refresh your look instantly.
Frequently Asked Questions (FAQs)
Can anyone with locs do the bow style?
Yes, the loc bow works on most loc lengths and textures, but extra-long or very short locs may need adaptations such as more clamps or additional stitches.
How long does a loc bow take to style?
Most people complete the style in 15–30 minutes, depending on experience. Tucking and sewing steps may take longer until familiar.
Does sewing the bow damage locs?
No, sewing with a dull needle and gentle technique won’t harm your locs. Avoid pulling the thread too tightly to prevent unnecessary tension.
What products are best for a sleek finish?
Edge control gels, moisturizing sprays, and accessories that do not snag are recommended. A silk scarf helps keep edges laid during setting.
Can I work out or sleep with a loc bow?
Yes—cover with a wrap before activity or bed, and double-check stitches for extra hold.
Pro Product Picks to Achieve the Loc Bow
| Product | Description | Where to Buy |
|---|---|---|
| Go Sleek Hair Edge Paste | Strong hold, sleek finish, controls flyaways | gosleek.com |
| The Frontal Queen Baby Hair Control | Baby hair tamer, soft sheen | thefrontalqueen.com |
| Hicks Total Transformations Edges Styling Gel | Non-flaking, high-hold edge styling gel | Amazon |
| Shine ’n Jam Magic Fingers for Braiders | Styling gel for braiding & locs; smooth application | Beauty retailers |
Final Thoughts: Celebrate Your Locs with the Bow Style
Embracing the loc bow means blending craftsmanship, patience, and a touch of playfulness. This style isn’t just about flair—it’s about celebrating the versatility and joyful spirit of locs. Whether it’s for a special event, a casual day out, or simply a mood boost, the loc bow is always a conversation starter and a reminder to enjoy your natural beauty with creative self-expression.
Want to See the Loc Bow in Action?
- Watch expert stylist Stasha Harris break down each step in Cosmopolitan’s Braid Up series.
- For alternative techniques and user hacks, numerous beauty creators share step-by-step loc bow guides on YouTube and social media platforms.
References
- https://www.youtube.com/watch?v=KMM_N0jOMbI
- https://www.cosmopolitan.com/style-beauty/beauty/a33393011/loc-bow-tutorial/
- https://www.youtube.com/watch?v=QtgDCz1H2wY
- https://www.youtube.com/watch?v=KmOIIEhusUU
- https://www.cosmopolitan.com/style-beauty/beauty/a43336257/loc-bow-with-rope-twist-braids-how-to/
- https://www.dailymotion.com/video/x7v6xb4
- https://www.youtube.com/watch?v=7eZWxBeyaL4