


The Ultimate Graduation Brownie Bites Recipe
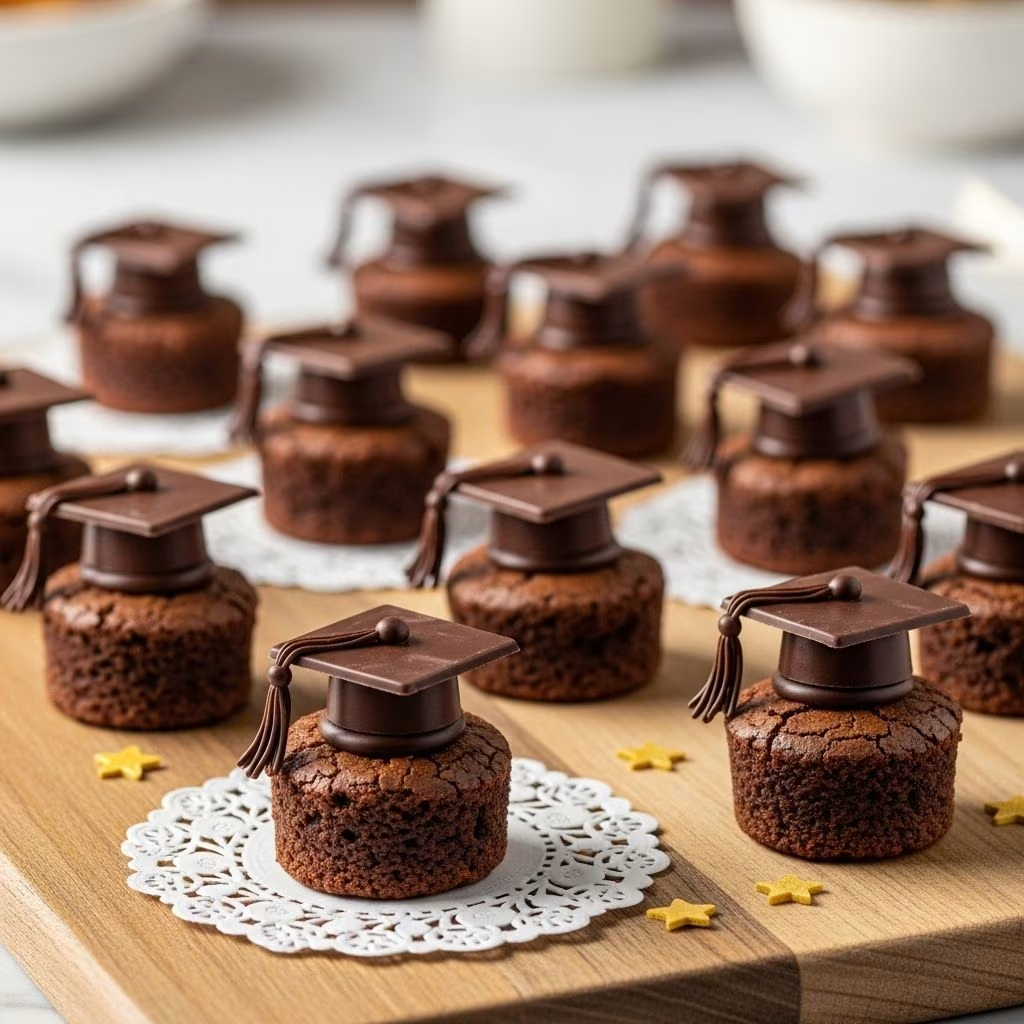
Graduation season calls for special treats that capture the joy and accomplishment of this milestone moment. These adorable graduation brownie bites are the perfect way to celebrate your graduate’s achievement while satisfying everyone’s sweet tooth. Designed to look like miniature graduation caps, these delightful treats combine rich, fudgy brownies with a glossy chocolate glaze and creative candy decorations that will have guests talking long after the party ends.
What makes these brownie bites truly special is their attention to detail and the way they transform a simple dessert into a themed celebration centerpiece. The combination of textures—from the dense, chocolatey brownie base to the smooth, velvety glaze—creates a sophisticated flavor profile that appeals to both kids and adults alike.
Why These Brownie Bites Are Perfect for Graduation Parties
Planning a graduation party involves countless details, but dessert doesn’t have to be complicated. These brownie bites offer several advantages that make them ideal for celebration gatherings:
Perfect Portion Control: Individual servings eliminate the need for cutting and serving, making them ideal for buffet-style celebrations or outdoor parties where guests are mingling and moving around.
Make-Ahead Friendly: The brownies can be baked a day in advance, and the entire assembly process can be completed hours before guests arrive, leaving you free to focus on other party preparations.
Customizable Colors: The beauty of these treats lies in their adaptability. You can easily customize the candy decorations to match your graduate’s school colors, making them feel extra special and personalized.
Impressive Presentation: Despite being relatively simple to make, these brownie bites look professionally crafted and will have guests wondering where you ordered them from.
Essential Ingredients for Success
The magic of these graduation brownie bites lies in the careful balance of ingredients that work together to create the perfect texture and flavor combination. Each component serves a specific purpose in achieving the final result.
For the Brownie Base
The brownie foundation requires premium ingredients to achieve the dense, fudgy texture that makes these treats so irresistible. Unsweetened chocolate provides the deep, rich chocolate flavor that forms the backbone of the brownies, while unsalted butter adds richness and helps create the perfect tender crumb.
All-purpose flour provides structure without making the brownies tough, and sugar not only sweetens but also contributes to the brownies’ characteristic shiny top crust. Fresh eggs act as a binding agent and add moisture, while vanilla extract enhances the chocolate flavor. A touch of unsweetened cocoa powder intensifies the chocolate taste and adds depth to the overall flavor profile.
For the Chocolate Glaze
The glossy chocolate glaze transforms simple brownies into elegant treats worthy of any celebration. Heavy cream creates the silky smooth base, while light corn syrup adds shine and prevents the chocolate from seizing. Semisweet chocolate provides the perfect balance of sweetness and chocolate intensity, and vanilla extract rounds out the flavors.
For the Graduation Cap Decorations
The decorative elements are what transform these brownies from ordinary treats to celebration showstoppers. Sour candy belts create the perfect tassels when cut into strips, while chocolate squares serve as the graduation cap tops. Mini candy-coated chocolates become the buttons that attach the tassels to the caps, adding both visual appeal and an extra burst of sweetness.
Step-by-Step Preparation Guide
Preparing the Perfect Brownie Base
Success with these brownie bites begins with properly preparing your mini-muffin pan. Generously butter and flour each cup to ensure easy removal after baking. This step is crucial—inadequate greasing will result in brownies that stick and break when removed.
Begin by melting the chocolate and butter together in a medium saucepan over low heat, stirring frequently to prevent burning. Once melted, remove from heat and allow the mixture to cool for 10 minutes. This cooling period is essential as it prevents the eggs from scrambling when added to the mixture.
Gradually stir in the sugar until well combined, then add eggs one at a time, mixing gently after each addition. Incorporate the vanilla extract, then fold in the flour and cocoa powder, mixing only until just combined. Overmixing can result in tough brownies, so use a light hand during this step.
Baking for Optimal Results
Scoop generous teaspoonfuls of batter into each prepared mini-muffin cup, filling them about two-thirds full. Avoid overfilling, as this can cause the brownies to overflow and lose their neat shape.
Bake at 350°F for 10 to 12 minutes, rotating the pan halfway through for even cooking. The brownies are done when they appear set and no longer jiggly in the center. A toothpick inserted should come out with just a few moist crumbs attached.
After removing from the oven, allow the brownies to cool in the pan for 10 minutes before inverting onto a cooling rack. Once removed, gently press down on any domed tops to create a flat surface that will sit nicely on your serving tray.
Creating the Perfect Chocolate Glaze
The glaze is what elevates these brownie bites from good to extraordinary. Combine heavy cream and corn syrup in a microwave-safe container and heat until steaming hot. Place the chopped chocolate in a separate bowl, add vanilla to the warm cream mixture, then pour over the chocolate.
Stir the mixture gently until the chocolate completely melts and the glaze becomes smooth and glossy. The consistency should be thick enough to coat the brownies but thin enough to flow smoothly. If the glaze becomes too thick, gently reheat it in short intervals.
Assembly and Decoration Techniques
Creating the Graduation Caps
The graduation cap decorations are surprisingly simple to create but require attention to detail for the best results. Using kitchen shears, cut the sour candy belt into twelve 1½-inch strips. Make a small V-cut on one end of each strip to create the classic tassel shape.
Turn chocolate squares upside down to create the flat graduation cap tops. Using a toothpick, apply a small dab of glaze to the center of each chocolate square and top with a mini candy-coated chocolate. This creates the button that will hold the tassel in place.
Attach the candy belt tassels using additional glaze as adhesive, positioning them so they hang naturally from the button.
Glazing and Final Assembly
Working with one brownie at a time, dunk each bite into the glaze, spooning additional glaze over the top to ensure complete coverage. Lift the brownie out using a fork, allowing excess glaze to drip off by gently tapping the fork against the bowl’s edge.
Carefully place the glazed brownie wide-side down on wax paper and immediately top with a decorated chocolate graduation cap while the glaze is still wet. This ensures the decoration will adhere properly as the glaze sets.
Allow the completed brownie bites to set for about 20 minutes before serving or transferring to your presentation plate.
Pro Tips for Perfect Results
Temperature Control: Ensure your chocolate doesn’t overheat during melting, as this can cause it to seize and become grainy. Low, gentle heat is key to smooth results.
Timing is Everything: Work quickly when glazing and decorating, as the chocolate glaze will begin to set relatively quickly. Have all your decorative elements prepared and ready before you begin the glazing process.
Color Coordination: Choose candy decorations that match your graduate’s school colors for an extra-special touch. Many candy stores offer chocolates and candies in a wide variety of colors.
Storage Solutions: These brownie bites can be made up to two days in advance and stored in an airtight container at room temperature. The glaze may lose some of its shine over time, but the flavor remains excellent.
Frequently Asked Questions
Can I make these brownie bites ahead of time?
Yes, these brownie bites can be prepared up to two days in advance. Store them in an airtight container at room temperature to maintain their texture and prevent the glaze from becoming sticky.
What if I can’t find sour candy belts for the tassels?
You can substitute fruit leather cut into strips, small pieces of licorice, or even create tassels from colored frosting piped through a small round tip.
How do I prevent the brownies from sticking to the pan?
Generously butter and flour your mini-muffin pan, making sure to coat every surface. You can also use baking spray with flour for extra insurance against sticking.
Can I customize the colors for different school themes?
Absolutely! Look for candy-coated chocolates and other decorative elements in your graduate’s school colors. Many candy stores offer a wide selection of colored chocolates and candies.
What’s the best way to transport these to a party?
Transport these brownie bites in a single layer in a covered container to prevent the decorations from shifting or breaking. A large, flat tupperware container or cardboard box lined with parchment paper works well.
How long do the brownie bites stay fresh?
When stored properly in an airtight container at room temperature, these brownie bites will stay fresh for up to three days. The brownies may actually improve slightly in texture after a day as the flavors meld together.
Serving and Presentation Ideas
These graduation brownie bites deserve a presentation that matches their elegant appearance. Arrange them on a tiered serving stand for maximum visual impact, or create a dedicated dessert table with graduation-themed decorations surrounding the treats.
Consider pairing these brownie bites with other graduation-themed foods like diploma roll-ups, academic cap cookies, or even a graduation cake as the centerpiece. The key is creating a cohesive theme that celebrates the achievement while satisfying everyone’s sweet tooth.
For outdoor graduation parties, these individual treats are ideal since they don’t require plates or utensils and can be easily enjoyed while socializing. Their compact size also makes them perfect for guests who want to sample multiple desserts without overindulging.
Making It Your Own
While this recipe creates perfect graduation-themed treats, don’t hesitate to adapt it for other special occasions. The basic brownie and glaze combination works beautifully for birthday parties, holiday celebrations, or any time you want to create impressive individual desserts.
Consider experimenting with different chocolate types in the glaze—dark chocolate creates a more sophisticated flavor profile, while milk chocolate offers a sweeter, more kid-friendly option. You can also add extracts like peppermint, orange, or coffee to create unique flavor variations.
The decoration possibilities are endless. Swap out the graduation caps for seasonal decorations, holiday themes, or colors that match your specific celebration. The key is maintaining the same attention to detail and quality ingredients that make these brownie bites so special.


