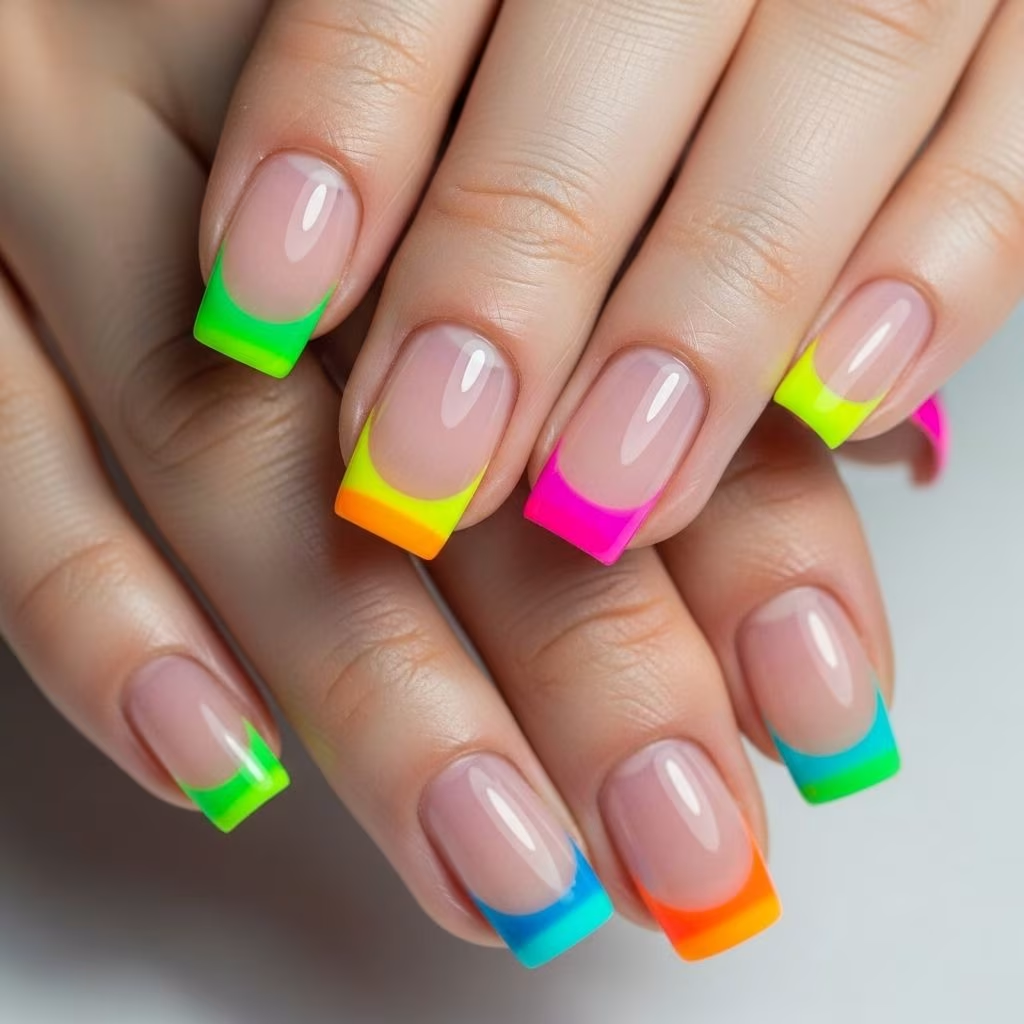
Nail Art How-To: Neon Rainbow French Manicure
Elevate your nail game with a vibrant, colorful twist on the classic French manicure. Nail artist Julie Kandalec shares her expertise for mastering a neon rainbow look using Sally Hansen polishes, creating a design that is both lively and easy for DIY enthusiasts. This guide provides detailed steps, tool recommendations, troubleshooting strategies, and creative ideas to ensure your results are as stunning as any professional salon’s.
Tools You’ll Need
- Basecoat (Sally Hansen Double Duty Base & Top Coat preferred)
- White opaque polish (Sally Hansen Hard as Nails Xtreme Wear Nail Color in “White On”)
- Thin striper brush (from Sally Hansen I Heart Nail Art Tool Kit or equivalent)
- Neon polishes (pink, yellow, blue, purple, red)
- Top coat (Sally Hansen Insta-Dri Top Coat)
Step 1: Prep and Paint
Careful nail preparation leads to lasting results. Begin by filing your nails into your preferred shape, then gently push back your cuticles—never cut them, as trimming risks infection and can cause uneven polish application. Wash hands to remove debris and apply a quality basecoat like Sally Hansen Double Duty Base & Top Coat.
Next, create an opaque backdrop to really make the neon colors shine. Apply two even coats of bright white polish, such as Sally Hansen Hard as Nails Xtreme Wear in “White On.” Let each coat dry thoroughly before the next to prevent streaking.
Step 2: Start Your Rainbow – Pinky Nail
Using a thin striper brush, dip into a vivid neon pink polish like Sally Hansen Insta-Dri in “Fuchsia Flare.” Paint a thin French tip along your pinky nail’s edge. Keep the stripe slender to achieve that chic, precise manicure look reminiscent of a salon finish.
Step 3: Move to the Ring Finger – Yellow Stripe
Clean your brush thoroughly with polish remover before changing colors. Dip into a vibrant yellow polish such as Sally Hansen Hard as Nails Xtreme Wear in “Mellow Yellow,” then sweep a thin stripe just along the tip of your ring fingernail. The bright contrast pops against the white base, blending smoothly into your rainbow theme.
Step 4: Complete the Rainbow Tips
- Middle Finger: Apply cobalt blue (Sally Hansen I Heart Nail Art Striper Polish in “Blue”)
- Pointer Finger: Brush on bright purple (Sally Hansen I Heart Nail Art Neon in “Vibrant Violet”)
- Thumb: Finish with a strong red (Sally Hansen Insta-Dri Nail Color in “Sonic Bloom”)
This color progression creates a gradient effect, making each nail unique while still offering a unified rainbow look. Allow each tip to dry before moving to the next color.
Step 5: Add Matching Accent Stripes
To elevate your design, match each French tip color on its nail with two more thin, horizontal stripes across the nail (skipping the ring finger for the accent nail in the next step). Use the striper brush to ensure crisp, symmetrical lines, which add playful complexity without overcrowding the design.
Step 6: Create a Rainbow Accent Nail
Designate the ring finger as your accent nail. Using your striper brush, paint a series of thin stripes using all the neon colors featured on the other tips: pink, yellow, blue, purple, and red. Start at the tip and layer each color for a bold, multi-hued finish. This strategic accent draws attention and visually balances your manicure.
Step 7: Seal and Finish
Cement your artwork with a fast-drying, glossy top coat such as Sally Hansen Insta-Dri Top Coat. This not only adds shine but also protects your design from chips and early wear. Take a moment to clean up edges with a pointed cotton swab dipped in remover.
Finally, treat yourself—and your cuticles—with nourishing oil to maintain a healthy nail bed, especially after heavy use of acetone or removers throughout the process.
Rainbow French Manicure Tips & Tricks
- Thin Lines: Use a striper brush with long, fine bristles for maximum control. The thinner the line, the more professional the look.
- Color Opacity: Opt for polishes labeled as ‘opaque’ or ‘high pigment.’ Sheer colors can fade against the white base.
- Dry Time: Allow plenty of time between painting stripes and applying a top coat. Quick-dry formulas help, but patience ensures crisp color separation.
- Clean-up: Keep a small brush and acetone handy to tidy up accidental smudges without disturbing the main design.
- Tool Hygiene: Thoroughly clean your brushes between colors to prevent muddying and maintain vivid stripes.
Product Recommendations
| Product | Suggested Use | Shade Example |
|---|---|---|
| Sally Hansen Double Duty Base & Top Coat | Base Coat, Top Coat | Clear |
| Sally Hansen Hard as Nails Xtreme Wear | White Base | White On |
| Sally Hansen Insta-Dri | Neon French Tips | Fuchsia Flare, Sonic Bloom |
| Sally Hansen Hard as Nails Xtreme Wear | Neon French Tips | Mellow Yellow |
| Sally Hansen I Heart Nail Art Striper Polish | Accent Stripes | Blue, Vibrant Violet |
| Sally Hansen I Heart Nail Art Tool Kit | Striping Brushes | Various |
Frequently Asked Questions
Q: Can I do a rainbow French manicure with other brands of polish?
A: Yes, nearly any high-quality polish with strong opacity will work. Sally Hansen is recommended for its range of neon shades and consistency.
Q: What can I do if my stripes bleed or look blurry?
A: Let each layer dry completely, use thin coats, and select a stiff striper brush. Clean-up with a small detail brush dipped in remover around the edges for perfection.
Q: How can I make the manicure last longer?
A: Use a durable base and top coat, take care not to apply polish on skin, and reapply top coat every few days for added shine and longevity.
Q: Is it okay to cut cuticles for a cleaner look?
A: It’s safer to gently push back cuticles; cutting risks infection and may impact the final appearance negatively.
Q: Which nail shapes work best with rainbow French tips?
A: Rainbow French tips look great on oval, square, almond, or coffin shapes. The effect is most pronounced on medium-to-long nails, but short nails can also shine.
Professional Variations & Inspiring Ideas
- Matte Finish: Add a matte top coat for a trendy, modern twist on the glossy classic.
- Studs & Rhinestones: Incorporate tiny neon studs or crystals near the cuticle to add a 3D effect.
- Geometric Breaks: Change up the tip shapes by creating angled or chevron stripes with different colors.
- Negative Space: Leave a portion of each nail untouched for a minimalist-yet-impactful look.
- Reverse French: Paint the color stripe at the nail base rather than the tip for a playful alternative.
Related Nail Art How-To’s
- Neon Studded Mani: Try adding colorful studs to your neon base for extra flair.
- Geometric Neon Mani: Explore bold, geometric shapes using neon polishes for a graphic and modern style.
Promote Your Rainbow Nails
Show off your finished design online. Share your look on Instagram, Pinterest, or Twitter and tag @Cosmopolitan with the hashtag #iHeartNailArt to join the vibrant community and get noticed for your creativity.
Be sure to check for contests sponsored by Sally Hansen for a chance to win nail art goodies and showcase your skills to a wider audience!
Final Words
Nail art is about expressing creativity and personal style. With easy techniques, accessible tools, and eye-catching colors, the neon rainbow French manicure offers a fresh update to a timeless classic. Celebrate your artistry and share your masterpieces—you might just inspire the next nail trend!
References
- https://www.cosmopolitan.com/style-beauty/beauty/how-to/a28772/rainbow-french-manicure-sally-hansen/
- https://www.youtube.com/watch?v=sv_n76dCfEc
- https://www.youtube.com/watch?v=sUpHbB4fwz4
- https://www.youtube.com/watch?v=92-CccX6WLg
- https://www.youtube.com/playlist?list=PLIDOxm6RSMrMI-giPJVq8Ey7eaVeFTV-T
- https://www.youtube.com/watch?v=kU2390k3F5w
- https://www.torontobeautyreviews.com/nail-education-part-1-sally-hansens-at/