Moringa, often celebrated as the “Miracle Tree,” is cherished for its fast growth rate and exceptional nutritional profile. Native to subtropical and semi-arid regions, this resilient tree is cultivated for its edible leaves, pods, and seeds—each part packed with vitamins, minerals, and disease-fighting antioxidants. This comprehensive guide covers everything you need to know to successfully grow moringa at home, from planting and care to harvesting and common issues.
About Moringa Oleifera
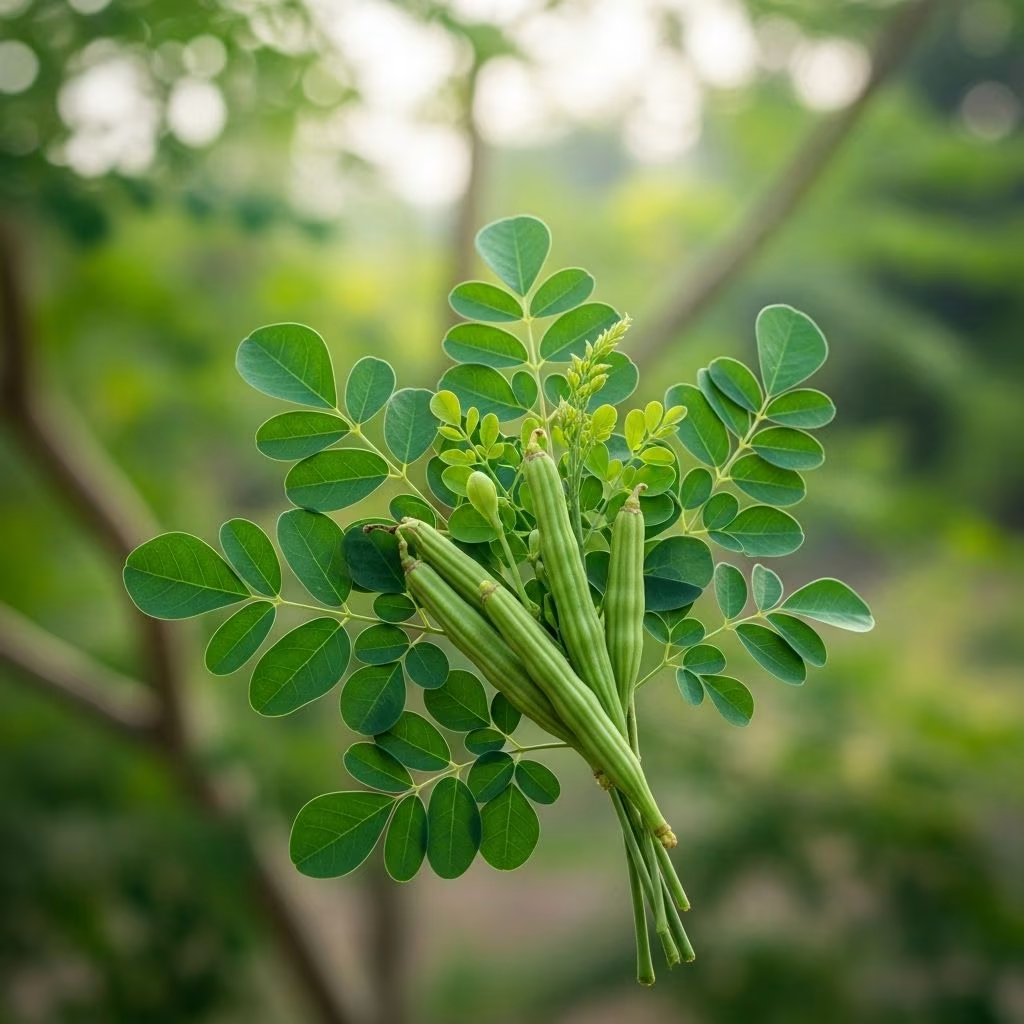
Moringa oleifera—sometimes called the drumstick, horseradish, or ben oil tree—is a fast-growing, drought-tolerant tree native to India and widely cultivated in Africa, Asia, and now in many parts of the world for its edible leaves, pods, and seeds.
Moringa’s superfood status comes from its nutrient density:
- Rich in vitamins A, B, C, D, E
- Contains essential minerals: calcium, potassium, iron, magnesium, selenium
- High in protein and essential amino acids
- Antioxidant and anti-inflammatory properties
Key Characteristics
- Grows up to 10–15 feet (3–4.5 m) in its first year under ideal conditions
- Produces edible leaves and seed pods
- Tolerant of heat and drought, prefers full sun
- Attractive feathery foliage and white blossoms
Planting Moringa
With the right start, moringa trees are exceptionally easy to grow, whether from seeds or cuttings.
Choosing the Right Location
- Full Sun: Needs at least 6–8 hours of direct sunlight daily
- Soil: Prefers loamy or sandy, well-draining soil with neutral to slightly acidic pH (6.2–7.0)
- Space: Mature trees have a deep taproot and need space to expand—allow 10–15 feet between trees
- Shelter: Young trees should be protected from strong winds and heavy storms
When to Plant
- Best time: Spring after all danger of frost has passed
- Soil temperature for germination: Between 77–95°F (25–35°C)
- Outdoor temperatures must stay above 50°F (10°C)—moringa seedling won’t tolerate cold, and temperatures below 45°F (7°C) can damage or kill young trees
Seed Starting
- Soak seeds in lukewarm water for 24 hours to speed germination.
- Fill seed-starting trays or pots with a mix of one part sand and one part compost for good drainage.
- Plant seeds 1/2 to 1 inch (1–2.5 cm) deep. Use a pencil or finger to poke a hole deep enough for the large seeds.
- Keep soil evenly moist, not soggy. Seeds germinate in 1–2 weeks when kept warm.
- Transplant seedlings once they are 6–12 inches (15–30 cm) tall into their permanent location.
Growing from Cuttings
- Take a mature, healthy branch (at least 1 inch thick and 12–18 inches long).
- Let it air-dry for one day to callous the cut end.
- Insert the thick end 6 inches deep in prepared soil with good drainage.
- Water sparingly until roots form, but don’t allow to dry out completely.
Planting in Containers
- Moringa adapts well to container life, especially in colder climates
- Choose containers at least 20 inches (50 cm) deep with drainage holes
- Fill with a fast-draining soil mix and place in a full-sun location
Caring for Moringa
Watering
- Young trees: Keep consistently moist but not waterlogged—a deep watering once a week
- Established trees: Drought-tolerant, only need watering during prolonged dry spells
- Moringa roots have a tuberous structure that stores water, making them resilient to brief drought
Fertilizing
- Moringa thrives with organic compost or well-rotted manure worked into topsoil
- Maintain a 2–3 inch (5–8 cm) layer of organic mulch around the base to retain moisture and suppress weeds
Temperature and Humidity
- Optimum temperature: 77–95°F (25–35°C)
- Tolerates hot, dry climates with low humidity as well as subtropical, lightly humid environments
- Protect from frost or prolonged cold snaps; bring containers indoors when temperatures drop
Pruning and Shaping
- Prune regularly to promote a bushier, more productive tree and keep at a manageable height
- Pinch or trim tops during early growth to encourage branching
- Remove dead branches as needed to maintain airflow
Pests and Diseases
Moringa is generally pest-resistant but can occasionally face issues:
- Aphids and leaf-eating caterpillars may appear on young foliage
- Root rot if grown in soil that remains soggy
- Fungal spots in humid climates—prune for airflow and avoid overhead watering
Harvesting and Storing Moringa
When to Harvest
- Leaves: Can be harvested as soon as the tree reaches 3–5 feet (1–1.5 m) in height
- Pods: Ready 6–8 months after planting, when young and tender (before seeds harden)
- Seeds: Collect from mature, dried pods
How to Harvest
- Snip young leaves and stems with clean shears or fingers (avoid over-harvesting from young trees)
- Gather pods while smooth and slightly flexible
- For seeds, allow pods to mature and dry on the tree, then crack open to collect
Storing Moringa
- Fresh leaves: Store in the refrigerator, wrapped loosely in a damp paper towel, for up to a week
- Dried leaves: Spread on trays out of direct sun, turning often until crisp; store in airtight containers
- Pods and seeds: Use fresh or dry thoroughly for long-term storage
Uses and Health Benefits of Moringa
Culinary Uses
- Young leaves used fresh in salads, smoothies, stir-fries, or dried for tea and powder
- Seed pods cooked in curries and stews (popular in Indian cuisine as “drumsticks”)
- Seeds are edible when cooked and sometimes pressed for oil
Key Health Benefits
- Packed with nutrients: High in vitamins, minerals, protein
- Winter immune booster: Vitamin C and antioxidants help fight off colds
- Anti-inflammatory: Compounds in leaves and pods may help reduce inflammation
- Supports healthy blood sugar and cholesterol levels
- Boosts energy and supports skin and eye health
Common Problems and Solutions
| Problem | Likely Cause | Solution |
|---|---|---|
| Yellowing leaves | Overwatering, poor drainage, or low nitrogen | Amend soil for drainage, allow topsoil to dry between watering, add compost |
| Slow growth | Not enough sun, rootbound in container, or poor soil | Move to brighter location, repot/root prune, enrich soil |
| Leaf curl or spotting | Fungal disease (high humidity, poor airflow) | Prune to open canopy, avoid leaf wetting, use organic fungicide if needed |
| Dropping leaves in winter | Natural semi-dormancy if exposed to cold | Move containers indoors, resume normal care as temps rise |
Frequently Asked Questions (FAQs)
Q: Can moringa grow indoors?
A: Yes, when grown in a large, sunny window or bright sunroom, moringa can thrive indoors. Choose a deep container and provide at least 6–8 hours of light daily.
Q: How long does it take for moringa to bear pods?
A: Under ideal conditions, moringa may start flowering and producing seed pods within 6–8 months of planting.
Q: What is the best way to use moringa leaves?
A: Fresh leaves are great in salads, smoothies, or stir-fries. Dried leaves can be crushed into powder and added to soups, teas, or used as a natural supplement.
Q: Are there any toxic parts in moringa?
A: The leaves, pods, and seeds are safe to eat when properly prepared. Avoid consuming large amounts of bark or root, which can be toxic.
Q: Why is my moringa not growing?
A: Causes may include low temperatures, insufficient sunlight, waterlogged soil, or poor fertilization. Check growing conditions and adjust as needed.
Final Tips for Growing Moringa Successfully
- Start seeds or cuttings after frost in full sun
- Ensure quick drainage and space for deep roots
- Feed with compost and water sparingly once established
- Prune early and often to encourage bushy growth and repeated harvests
- Protect young plants from wind and animals
By following these steps, you’ll be well on your way to enjoying fresh, nutritious moringa right from your garden or balcony. Happy growing!