How to Fix or Replace a Tub and Shower Faucet Cartridge
Cartridge-style faucet valves are a common feature in many modern tubs and showers. Over time, the cartridge can wear out or fail, leading to symptoms such as leaks, inconsistent water temperature, or poor water pressure. Replacing a faulty cartridge yourself can save time and money, prevent further plumbing issues, and restore your faucet’s optimal function. This guide provides a complete walk-through for diagnosing, removing, and installing a new tub or shower faucet cartridge safely and efficiently.
Why Replace a Tub or Shower Cartridge?
A failing cartridge can cause several household inconveniences:
- Leaks: Water may drip from the spout, even when the valve is closed.
- Low water pressure: Blockages or malfunctioning parts can reduce flow.
- Poor temperature control: If the cartridge cannot mix hot and cold correctly, water temperature will fluctuate or remain stuck.
- Stiff or difficult handle movement: A worn or corroded cartridge can make operating the handle tough or uneven.
Replacement restores comfortable, predictable shower and bathtub operation, guards against water damage, and can often be handled in about an hour with basic tools.
Tools and Materials Needed
- Replacement cartridge (confirm compatibility with your valve brand and model)
- Screwdriver (flathead and Phillips)
- Adjustable wrench
- Allen wrench set (where applicable)
- Plumber’s grease
- Needle-nose pliers
- Towels or small bucket for water
- Safety glasses
- Retaining clip puller (optional)
Step-by-Step Instructions
1. Turn Off the Water Supply
Shut off water to the bathroom or the main water supply for your home. This prevents flooding or accidental water flow when you open the faucet assembly. Open the faucet briefly to release any remaining water and depressurize the system.
2. Remove the Faucet Handle and Trim Plate
- Locate the screw holding the handle—often concealed behind a decorative cap.
- Remove the cap (if present) with a flathead screwdriver.
- Unscrew the handle screw using either a Phillips screwdriver or Allen wrench, depending on the model.
- Gently pull off the handle.
- Unscrew the trim plate securing the valve assembly to the wall. Some trim plates also snap off or are held by retaining nuts.
Place all components safely aside and keep track of screws and caps.
3. Expose and Remove the Cartridge
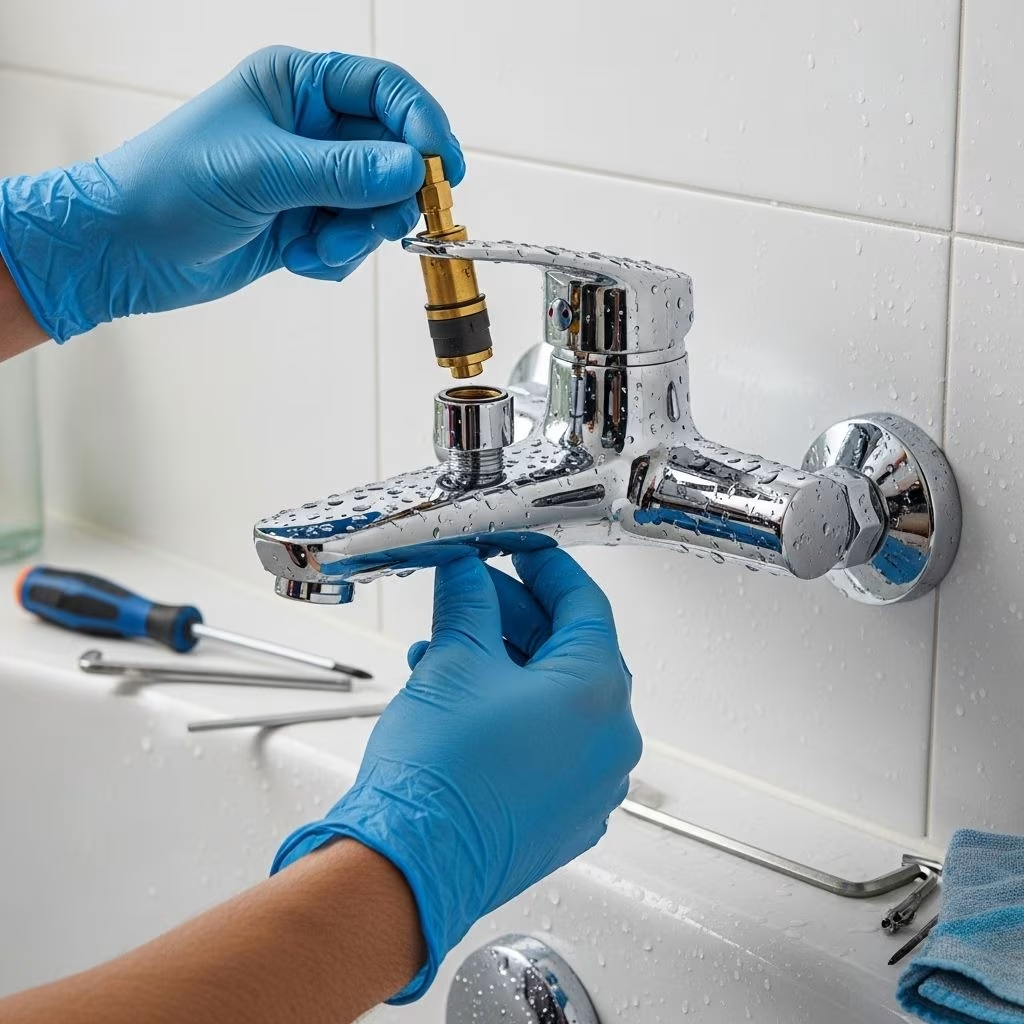
- With the trim plate off, the valve’s inner workings are accessible. The cartridge is usually secured by a retaining clip, screw, or nut.
- Remove the retaining clip with needle-nose pliers or a clip puller. Retaining nuts can be loosened with an adjustable wrench.
- Take note of the cartridge’s orientation—some must be installed a specific way for proper hot/cold water mixing.
- Gently wiggle and pull the cartridge straight out. Use gentle force; avoid twisting or prying aggressively, which could damage the valve or surrounding plumbing.
- If the cartridge is stuck due to mineral deposits or corrosion, apply a little penetrating oil and leave for several minutes. Carefully try again.
4. Prepare the Replacement Cartridge
- Carefully compare the new cartridge to the old. Ensure they are identical in size, shape, and configuration.
- Apply a thin layer of plumber’s grease to the O-rings and contact surfaces of the new cartridge.
- Check that any tabs or notches are aligned in the same orientation as the old cartridge.
5. Install the New Cartridge
- Slide the new cartridge into the valve body, making sure it is properly aligned.
- Push in until fully seated. Reattach the retaining clip, screw, or nut as required by your model.
Double-check that the cartridge is installed evenly, with no gaps or misalignment.
6. Reassemble the Faucet
- Replace the trim plate and handle, reversing the steps from earlier.
- Secure screws firmly but do not overtighten, as this can crack the trim plate or strip screw threads.
- Ensure the handle mechanism feels smooth and consistent.
7. Restore Water and Test
- Turn the water supply back on.
- Slowly operate the handle to engage the valve and check for leaks around the handle or behind the trim plate.
- Test hot and cold water to ensure proper temperature mixing and consistent water pressure.
- If leaks or drips persist, repeat earlier steps and check cartridge seating and trim plate fit.
Troubleshooting Common Issues
- If water continues leaking: The cartridge may not be fully seated, or an O-ring may be misaligned.
- If the handle is stiff or difficult to turn: The cartridge or surrounding mechanism may have debris or damaged parts.
- If the new cartridge does not fit: Double-check compatibility (model and brand). Some faucets require exact replacement parts; generic cartridges may not work.
- If water flow is still poor: The valve body itself or supply lines may be blocked.
Refer to the faucet manufacturer’s guide for model-specific troubleshooting.
Preventative Maintenance Tips
- Periodically clean the faucet’s aerator and flush supply lines to prevent mineral buildup.
- Use plumber’s grease for reassembly to keep seals supple and prevent leaks.
- Replace cartridges every 5–7 years, or when symptoms arise.
- Always keep documentation and a spare cartridge handy for faster repairs in the future.
Safety and Preparation Guidelines
- Always shut off water before starting. Accidental flooding is a risk.
- Wear safety glasses. Protect your eyes from unexpected spray or debris when removing the cartridge.
- Place towels or small bucket: Catch residual water during removal and prevent slipping.
- Keep track of small parts: Screws, caps, and nuts are easy to misplace but hard to replace.
Take your time—much of the frustration comes from trying to rush or force parts, so patience is key. If at any point you feel out of your depth, seek professional assistance.
Choosing the Right Replacement Cartridge
Before purchasing a new cartridge, determine the make and model of your existing faucet valve. This can usually be found on the trim plate, handle, or behind documentation left by the previous installer. If uncertain, remove the old cartridge and take it to a hardware store or plumbing supplier for exact matching. Brands such as Moen, Delta, and Kohler offer specific replacement parts and guides online.
When to Call a Professional Plumber
- Severe corrosion: If the valve body or cartridge is badly corroded or stuck fast and cannot be removed safely.
- Persistent leaks: If leaks persist after multiple attempts and troubleshooting.
- Complex assemblies: Some showers/tubs have integrated multi-port valves or pressure balancing systems requiring expert attention.
- Water damage: If water leaks have caused damage behind walls or below the tub/shower.
FAQs: Tub and Shower Faucet Cartridge Replacement
Q: How do I know my cartridge needs replacement?
A: Signs include water leaking from the spout when the faucet is turned off, inconsistent water temperature, weak water pressure, or a handle that is difficult to operate.
Q: Is it safe to replace the cartridge myself?
A: Yes, as long as water is shut off and you feel comfortable using basic tools. Take safety precautions and don’t force stubborn parts.
Q: How long does cartridge replacement take?
A: Most replacements take 30–60 minutes if you have the proper parts and tools.
Q: What if I cannot identify the cartridge brand?
A: Remove the cartridge and take it to a plumbing supply store, where staff can help match it visually. Many manufacturers also include part numbers on the cartridge itself.
Q: What risks should I watch for?
A: Biggest risks are water splashing, misplaced small parts, and damaging the valve body by excessive force.
Summary Table: Replacement Process vs. Common Issues
| Step | Purpose | Common Issue | Solution |
|---|---|---|---|
| Turn Off Water | Prevents flooding | Water doesn’t shut off | Use main supply valve; verify system is drained |
| Remove Handle & Trim | Exposes cartridge | Screws stripped or stuck | Use penetrating oil and proper screwdriver |
| Remove Cartridge | Access damaged part | Cartridge stuck/corroded | Apply oil, wiggle gently, use correct tools |
| Install Cartridge | Restore valve function | Cartridge doesn’t fit | Double-check model; exchange if needed |
| Test Faucet | Ensure proper operation | Leaks or poor flow | Check seating, seals, troubleshoot further |
Ongoing Maintenance and Final Checks
Regularly check the faucet for leaks or sluggish operation, and consider repeating cleaning or cartridge replacement every several years to maintain optimal function. Keep manufacturer guides and part numbers where accessible to streamline future repairs.
Frequently Asked Questions (FAQs)
Q: Can I use generic cartridges for my tub/shower faucet?
A: While some generic cartridges are compatible, many faucets require exact manufacturer parts. Always match model and configuration for best results.
Q: Will replacing the cartridge solve all leaks?
A: Most handle or spout drips are solved by replacement, but leaks behind the wall or from multiple sources may need further diagnosis.
Q: How can I prevent future cartridge issues?
A: Perform regular cleaning, minimize water hardness with a softener, and lubricate O-rings as directed by manufacturer. Replace at signs of wear, not just complete failure.