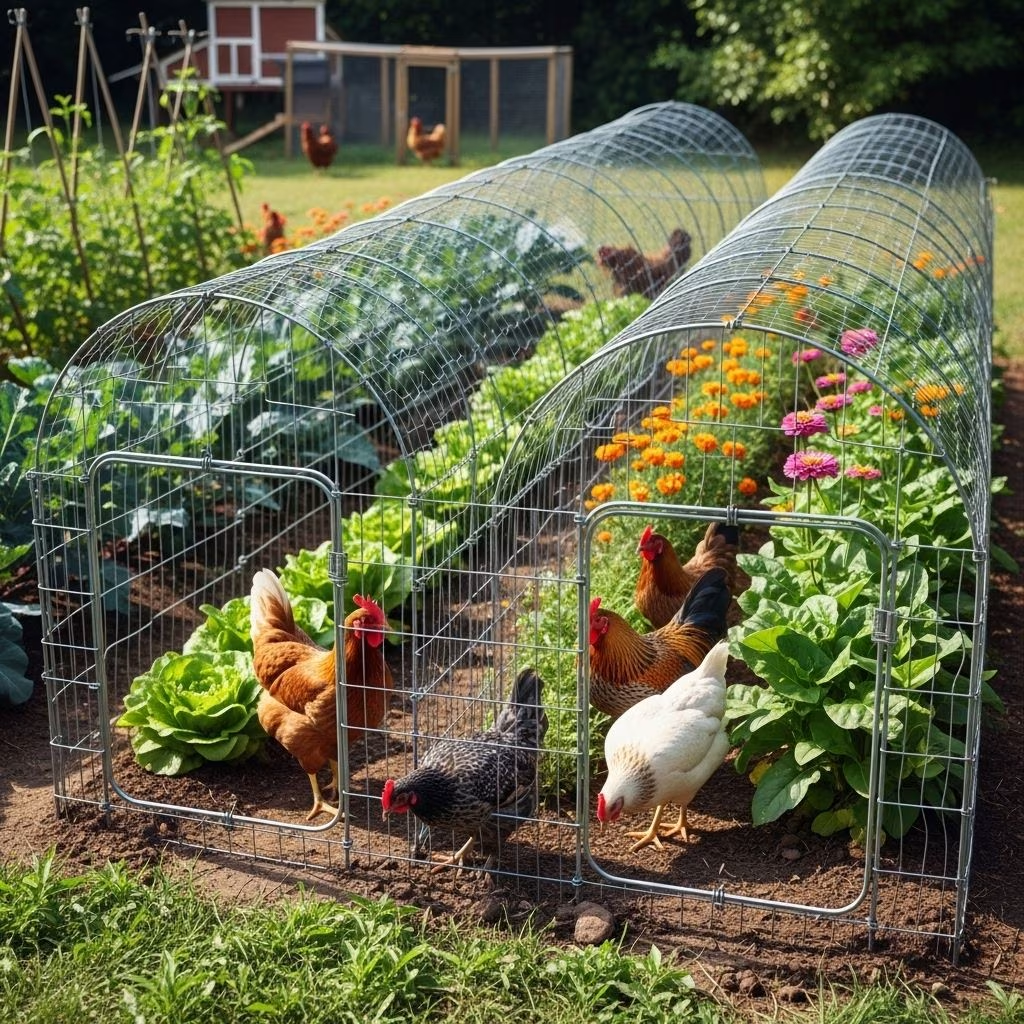
Chicken Tunnels (“Chunnels”): Safe Freedom for Your Flock—and Your Garden
If you keep backyard chickens, you know that balancing their desire to roam with the need to protect your flock can be tricky. Chicken tunnels, also known as chunnels, offer a clever and practical solution: they let your birds explore, forage, and control garden pests, all while staying safely contained and protected from predators. This comprehensive guide explains everything you need to know about chicken tunnels—from their benefits to practical design tips—so you can provide your flock with the freedom they crave and your garden with natural pest control.
What Is a Chicken Tunnel (Chunnel)?
A chicken tunnel is essentially a long, narrow, predator-proof run—constructed primarily from sturdy wire mesh—designed to allow chickens to roam specific areas of your yard or garden safely. These tunnels can wind around garden beds, follow property boundaries, or even form loops that connect to multiple chicken runs. They offer a versatile, modular approach to expanding your flock’s range without opening your entire backyard to wandering hens or neighborhood pests.
Key Characteristics of Chunnels
- Constructed from strong wire mesh with small openings to keep chickens in and predators out.
- Can be straight, curved, or looped—customized to your yard or garden plan.
- Height and width are sized for chickens to move, forage, and even turn around comfortably.
- Usually fixed to the ground with landscape staples, tent pegs, or similar fasteners for stability and security.
Why Build a Chicken Tunnel? Top Benefits
Chicken tunnels solve several challenges faced by backyard chicken keepers and gardeners alike. Here are their main advantages:
- Enhanced Safety: Tunnels keep your flock protected from common predators like foxes, stray cats, or birds of prey.
- Natural Pest & Weed Control: By directing chickens around garden beds, chunnels let your flock feast on insects and weeds threatening your vegetables and ornamentals.
- Space Efficiency: Even small backyards gain more usable chicken range when chunnels hug fence lines or snake through narrow strips of yard.
- Healthier, Happier Chickens: Chickens are naturally curious foragers. Chunnels provide fresh forage, exercise, and mental stimulation, reducing boredom and stress.
- Garden Protection: With chunnels, chickens stay off your prized crops but remain close enough to provide natural fertilization and pest control around the perimeter.
- Lower Maintenance: Chickens help keep weedy grass edges and unwanted bugs at bay, saving you hours of manual labor.
How Chicken Tunnels Work: Real-World Examples
Backyard poultry keepers and homesteaders report a variety of creative chunnel configurations:
- Running Along Fences: A popular layout places tunnels parallel to fences, creating a narrow circuit that both confines chickens and lets them access fresh ground daily.
- Encircling Garden Beds: By tracing garden perimeters, chickens act as a living barrier to slugs, snails, and weeds, protecting inner crops.
- Connecting Runs and Coops: Tunnels can join multiple coops, runs, or pasture areas, enabling rotational grazing and flexible management.
- Temporary or Rotational Sections: Some owners design modular sections that open and close, allowing one area to rest and regenerate while birds work another zone.
What Materials Do You Need to Build a Chicken Tunnel?
Most DIY chunnels use affordable, readily available materials. Here’s a typical supply list for a simple, straight tunnel:
- Rigid wire mesh or welded wire (hardware cloth): Acts as the tunnel’s walls and ceiling. Ensure mesh openings are under 4 cm (1.5 inches) to keep chickens in and predators out.
- Chicken wire (optional): Can add an extra layer of protection or patch larger holes in mesh.
- Zip ties: Quick, easy fasteners for assembling mesh and joining tunnel sections.
- Landscape staples, tent pegs, or heavy-duty stakes: Hold the tunnel firmly to the ground, preventing digging by predators or escapes by adventurous hens.
- Wire cutters, pliers, work gloves: For cutting and shaping mesh safely.
Cost Estimates
Many backyard keepers report building 10–20 foot chunnels for $80 to $100 using new materials. Repurposed materials—like leftover fencing, scrap wire, or recycled mesh—can further cut costs.
Step-by-Step Guide: Building Your Own Chicken Tunnel
- Plan Your Path: Identify where you want the tunnel to run—along fences, around beds, or connecting runs. Measure the total length and note any curves or entry points.
- Shape the Mesh: Roll out your wire mesh and use wire cutters and pliers to shape it into an arched tunnel. A common size is 12–18 inches wide and 12–18 inches high, though larger hens may need more space.
- Connect Mesh Sections: If your tunnel is longer than your roll of mesh, securely overlap and knot together each section with zip ties or wire.
- Secure to Ground: Use landscape staples, stakes, or tent pegs every 18–24 inches along the base. Ensure the tunnel hugs the ground so determined predators cannot dig underneath.
- Add Entry/Exit Points: For tunnels that connect to runs, coops, or garden areas, zip-tie the tunnel end directly to the enclosure. Consider a simple gate or removable mesh cap to allow access and cleaning.
- Check Safety: Walk the length of the tunnel and inspect for exposed sharp edges, gaps, or loose sections. Patch any hazards before allowing the chickens entry.
- Let the Chickens Explore! Guide your flock into their new tunnel and watch as they peck for bugs, nibble weeds, and enjoy safe adventuring.
Design Tips and Tricks for the Perfect Chunnel
- Predator Proofing: Use mesh with small openings and secure it tightly. For known diggers (like foxes), place flat rocks, pavers, or a length of mesh apron along tunnel edges.
- Modular Sections: Consider building tunnels in 3–6 foot segments joined with zip ties. Remove sections easily for mowing or garden changes.
- Flexible Routing: For curves, snip the mesh at intervals to allow bending, or join multiple shorter, angled segments.
- Shade and Forage: Place chunnels in areas with grass, shade, or edible plants. Chickens will keep weeds trimmed, fertilize the soil, and can even help prep garden beds in fall or spring.
- Rotational Grazing: Add gates or closable segments to let one section rest and recover while chickens graze the other, keeping forage fresh and chickens healthy.
- Vertical Height: Chickens should be able to walk upright. For large breeds, aim for taller, broader tunnels.
- Easy Access: For maintenance, design one or two removable panels or hatch areas. This helps if a chicken gets stuck or you want to relocate the tunnel.
DIY versus Prefab Chunnels: Should You Build or Buy?
| DIY Chicken Tunnel | Pre-made/Purchased Tunnel |
|---|---|
| Customizable to any layout, length, or shape. May be less expensive if using recycled materials. Requires basic tools and some time to assemble. | Quick setup with predefined size and shape. Lower time investment. Usually more expensive per foot; less flexible design options. |
| Can incorporate scavenged hardware or fencing. Satisfaction of building your own. | Ready-to-use—ideal for those short on time or DIY experience. |
Both options deliver the core benefits of safe, restricted free ranging for your flock—choose what matches your skills, budget, and timeline.
Common Problems and Smart Solutions
- Predators Digging Underneath: Extend mesh several inches outward on both sides or embed large rocks/bricks along the base as a barrier.
- Plants Damaged Too Quickly: Rotational systems allow forage to regrow. Add cages around delicate seedlings until established.
- Sharp Edges Exposed: Fold or cover all cut wire ends. Use duct tape or special PVC sleeves on high-traffic areas.
- Tunnel too Flimsy: Choose heavy-gauge mesh, and reinforce long runs with extra stakes or short supporting posts every few feet.
Expert Tips from Real Chicken Keepers
- “We have foxes and birds of prey everywhere. The chunnel is as close to free-range as we can get, and they don’t need supervision.” – Suburban Homesteading
- “Your chickens will love their chunnel, and protection from hawks gives you peace of mind to let them range.” – Leslie Wray Doyle
- “Placing the tunnel around raised beds lets my hens eat bugs before they reach my veggies, and they fertilize the soil as they walk by.”
Frequently Asked Questions (FAQs)
What size mesh should I use for my chicken tunnel?
Use rigid wire mesh with openings less than 4 cm (1.5 inches). Smaller is better for keeping small birds or chicks in and predators out.
Can chicken tunnels help with garden pests?
Yes! By placing chunnels around vegetable beds or property lines, chickens gobble up insects and weed seeds, reducing pests and the need for chemicals.
Do chicken tunnels replace a coop or regular run?
No, chunnels are a supplement for supervised or protected ranging and pest control. Chickens still need a secure coop for overnight safety and a main run for shelter and resting.
Will chickens use the tunnel on their own?
Most chickens eagerly explore chunnels once they learn the route. Show new flocks the entrance and reward with treats if needed.
What if I need to mow or weed around the tunnel?
Modular tunnel sections (every 3–6 feet) can be detached for easy garden or lawn maintenance. Plan your path to minimize interference with mowing schedules.
Conclusion: A Win-Win for Chickens and Gardens
A chicken tunnel (chunnel) offers a practical, affordable way to give your flock more freedom while defending your garden from weeds and pests. With basic materials, a few hours of effort, and a dose of creativity, anyone can create a backyard ecosystem where chickens and vegetables thrive together. So grab your wire mesh, zip ties, and a sense of adventure—your happy hens (and lush garden) will thank you!
References
- https://moreleafymoments.com/how-to-make-a-chicken-tunnel-easy-diy-project/
- https://www.countryliving.com/life/kids-pets/a16758721/chicken-tunnel/
- https://goodlifepermaculture.com.au/chook-tunnel/
- https://www.youtube.com/watch?v=NHEy7mZ79NA
- https://blog.meyerhatchery.com/2022/03/build-a-chicken-tunnel-or-chunnel/