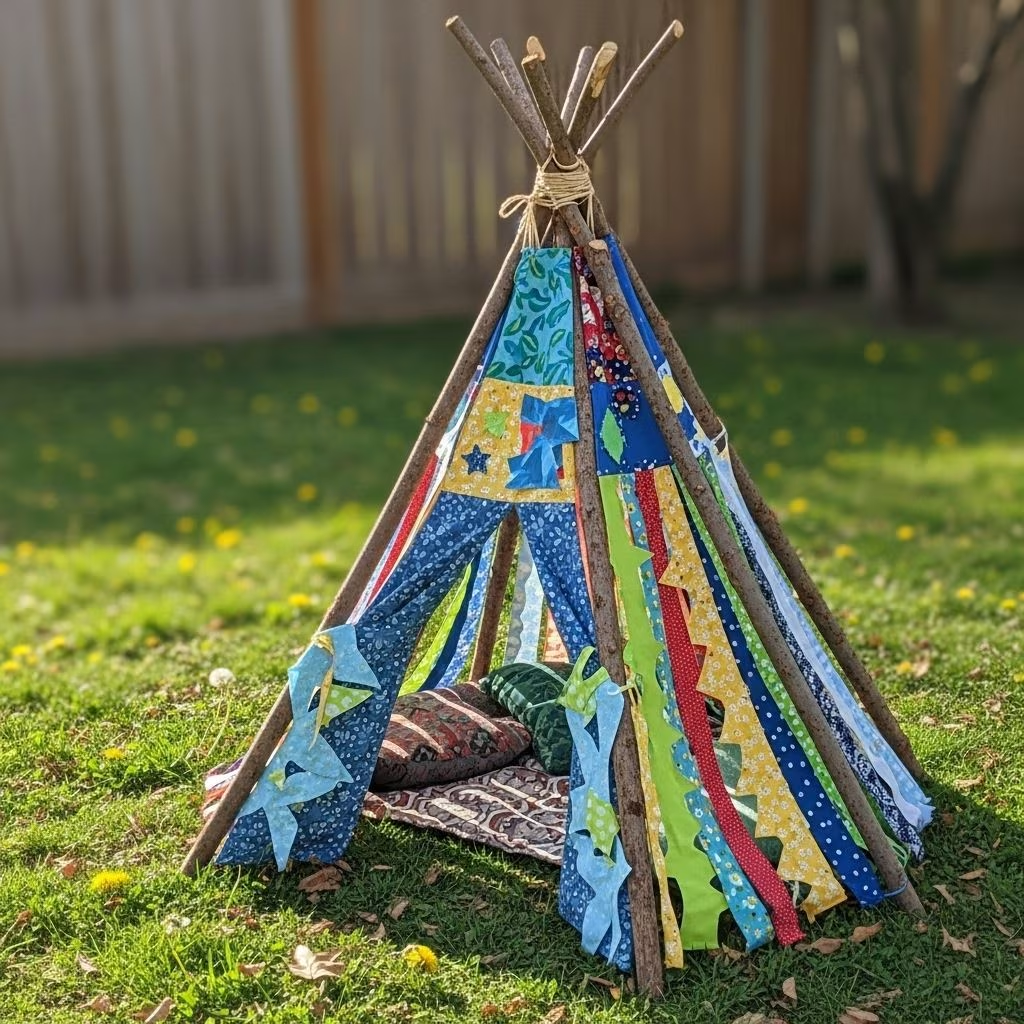
Teepees are a classic, whimsical feature for playrooms, bedrooms, and gardens, offering kids (and adults) a cozy nook for reading, relaxing, or imaginative play. This comprehensive guide will show you how to build a sturdy, beautiful, and cost-effective teepee using sticks and scrap fabric—no special skills or expensive supplies needed.
Introduction to DIY Teepee Making
A teepee, or tipi, is a conical tent traditionally made by indigenous peoples of the Plains, designed to be portable and weather-resistant. While modern DIY teepees are not intended for living outdoors, they offer a charming and functional hideaway for children or as décor. Making a teepee from sticks and scrap fabric is not only budget-friendly but also a sustainable way to use leftover materials and natural resources.
Materials and Tools
Before you start, gather all necessary supplies. Most items can be sourced from around the house, hardware store, or your backyard.
- Sticks or Poles: Five sturdy branches or wooden dowels, 5-8 feet long and about 1 inch in diameter. If making a mini teepee, shorten accordingly.
- Scrap Fabric: Old sheets, curtains, tablecloths, or large pieces of fabric. Aim for at least 4–5 yards, depending on teepee size.
- Rope or Cord: 1–2 yards of sturdy rope or thick twine to tie poles together.
- Bias Tape: (Optional for a neat finish)
- Rubber Chair Leg Tips: (Optional to protect your floor)
- Scissors or Rotary Cutter
- Measuring Tape or Yardstick
- Drill: For making holes in the tops of the sticks/dowels.
- Sandpaper: (Optional, for smoothing rough edges on sticks)
- Sewing Machine and Thread: (For sewn versions)
- Pins and Fabric Chalk
- Buttons, Ribbons, Paint, or Other Decorations
Material Selection Tips
- Choose straight, dry branches free from rot or sharp edges. Hardwood sticks offer best durability.
- Repurpose old curtains, bed sheets, or thrifted fabric for the covering. Thicker materials (canvas, twill) make stronger teepees, but lightweight cloth works for indoor play.
Preparation and Planning
Success starts with clear planning.
- Decide on the teepee’s size and location: Measure available floor space and desired height. For most children’s teepees, 5–6 feet tall with a 4–5 foot diameter base is suitable.
- Record your dimensions; this will inform how much fabric you need and where to cut and drill the sticks.
- Ensure you have enough room around the assembly area to spread out materials.
Basic Teepee Geometry
DIY teepees are usually built with five sticks forming a pentagonal base. The fabric is cut into panels (triangles) and sewn or tied between the poles. A front opening (door) makes it easy to enter and exit.
Step-by-Step Building Instructions
Step 1: Gather and Prepare Your Sticks
- Locate five strong, similar-length sticks or use wooden dowels. Cut to desired length if needed.
- Using sandpaper, smooth any sharp or splintered areas—especially where children may handle the poles.
- Drill a hole about 9–10 inches from one end of each stick. This hole is for threading the rope and provides a solid pivot for the frame.
- For added safety indoors, fit rubber chair tips to the stick bottoms.
Step 2: Construct the Frame
- Lay the sticks side by side, aligning the drilled holes. Thread a rope or cord through all the holes.
- Pull the rope tight and tie it in a strong knot, leaving about a foot of extra rope for future adjustments or wrapping.
- Stand up the frame, spreading the sticks to form a wide conical shape. Adjust the angles until the base is even and stable.
- Wrap the excess rope several times around the top intersection before tying off securely. This holds the teepee’s form.
| Feature | Standard Size | Mini Teepee | Large Teepee |
|---|---|---|---|
| Stick Length (ft) | 5–6 | 3–4 | 7–8 |
| Base Diameter (ft) | 4–5 | 2–3 | 6–7 |
| Height (ft) | 5–6 | 3–4 | 7–8 |
Step 3: Measure and Cut Fabric Panels
- Lay out your scrap fabric on a clean surface, wrong side up. Use a yardstick and fabric chalk to draw five identical triangles. Each triangle should be as tall as your sticks and roughly as wide as one-fifth the circumference of your projected base.
- For a standard 5-foot-high teepee, each panel might be about 7.5 inches wide at the top and 40 inches wide at the base.
- Cut out each triangle. On one panel, cut a vertical slit (about 38 inches) from the bottom to serve as the entryway.
Step 4: Assemble and Sew the Fabric Cover (Optional for No-Sew)
- Pin the triangles together lengthwise, matching the sides. Start with wrong sides together to allow for later tube seams that will form the dowel pockets.
- Sew each pair with a 3/8-inch seam allowance. Attach bias tape with a zig-zag stitch along the front door slit to prevent fraying.
- After sewing the panels, turn the cover inside out and sew along the same seams with a 1.5-inch seam allowance. These tube seams are where the sticks will slide through.
- Sew bias tape or hem the edges around the top and bottom of the teepee cover for a tidy finish.
Step 5: Dress the Frame
- Slip each stick through the tube seams of the fabric cover, ensuring the drilled ends remain together at the top.
- Spread the poles evenly to give the teepee its shape, and tie the rope securely while the teepee is upright. Adjust until the structure feels stable and symmetrical.
- Double-knot the rope and trim excess. Secure knots in the rope ends or tape them to prevent unraveling.
- At this stage, the fabric should hang snugly but not be excessively stretched. If loose, tighten with ribbons or fabric ties at the back.
No-Sew and Quick Alternatives
If you’d like to skip sewing altogether, you can still achieve a fun and functional teepee.
- Drape-and-Tie Method: Simply drape large sheets, drop cloths, or scrap blankets over the frame and tie or clip the corners behind the sticks.
- PVC Substitution: Use PVC pipes instead of wood for a lighter pop-up option.
- Secure with clothespins, safety pins, or small bungee cords. Overlap fabric panels to create an entrance.
- This method is perfect for temporary setups, parties, or if you lack sewing skills or equipment.
Customizing and Decorating Your Teepee
- Paint or Dye: Paint designs or dye fabric for a personalized touch—try geometric patterns, stars, or your child’s name.
- Outdoor Friendly: For garden teepees, use weather-resistant fabric and add extra ties between panels for wind resistance.
- Lighting: String fairy lights around inside poles or from the top for magical night-time use (battery-operated lights are safest).
- Flooring: Add a soft blanket, yoga mat, or cushions inside for comfort.
- Accessories: Hang bunting, beads, or ribbons from the entrance. Create matching storage baskets or a nameplate for extra flair.
Safety and Maintenance Tips
- Always check the teepee’s stability before use, especially if young children will play inside. Arrange the poles so the teepee doesn’t easily tip over.
- Secure all knots, and periodically tighten rope or cord as fabric stretches with use.
- Keep away from open flame, heaters, or direct heat sources—most fabrics and sticks are flammable.
- Wash and dry the fabric covering as needed. For outdoor use, allow the teepee to dry thoroughly after rain to prevent mold.
- Inspect poles regularly for cracks or splinters.
Frequently Asked Questions (FAQs)
Q: How long does it take to make a DIY teepee?
A: For a basic sewn teepee, expect 4–6 hours for a first build—including measuring, cutting, sewing, and assembly. No-sew versions can be completed in less than an hour.
Q: What are the best types of sticks or branches to use?
A: Use hardwood branches (oak, maple) or bamboo for durability. Ensure they are straight and free from large knots to make assembly easier. Avoid green or freshly cut branches, as they may warp while drying.
Q: Can I make a teepee large enough for adults?
A: Yes. Use longer poles (7–8 feet) and increase the fabric base circumference. Ensure the structure is anchored securely and choose strong fabric for the covering.
Q: How can I make my teepee waterproof for outdoor use?
A: Choose synthetic or outdoor canvas fabric. Apply a fabric protector spray or waterproofing treatment before assembling.
Q: How do I store my teepee when not in use?
A: Disassemble it by removing the sticks from the fabric cover. Fold the cover and stack the sticks together. Store them in a dry location to avoid moisture damage.
Conclusion
Building a simple teepee from sticks and scrap fabric is a rewarding, eco-friendly project that sparks creativity and brings families together. Whether you’re crafting an indoor reading tent, a magical garden hideaway, or a festive play structure for a party, these easy steps adapt to any space or style. Most importantly, your homemade teepee is a meaningful, sustainable addition to your home—one that can be easily customized, moved, and enjoyed for years to come.
References
- https://welcometonanas.com/diy-kids-teepee/
- https://www.instructables.com/How-To-Build-A-Teepee/
- https://www.personalcreations.com/blog/how-to-make-a-teepee
- https://fudgeyjoy.wordpress.com/2014/05/29/diy-teepee-learn-to-create-a-teepee-of-any-size/
- https://gardensthatmatter.com/build-backyard-teepee/
- https://www.youtube.com/watch?v=09YdNSZKAl0
- https://www.thehandmadehome.net/a-no-sew-teepee/
- https://www.homestoriesatoz.com/decorating/diy-teepee-no-sew.html