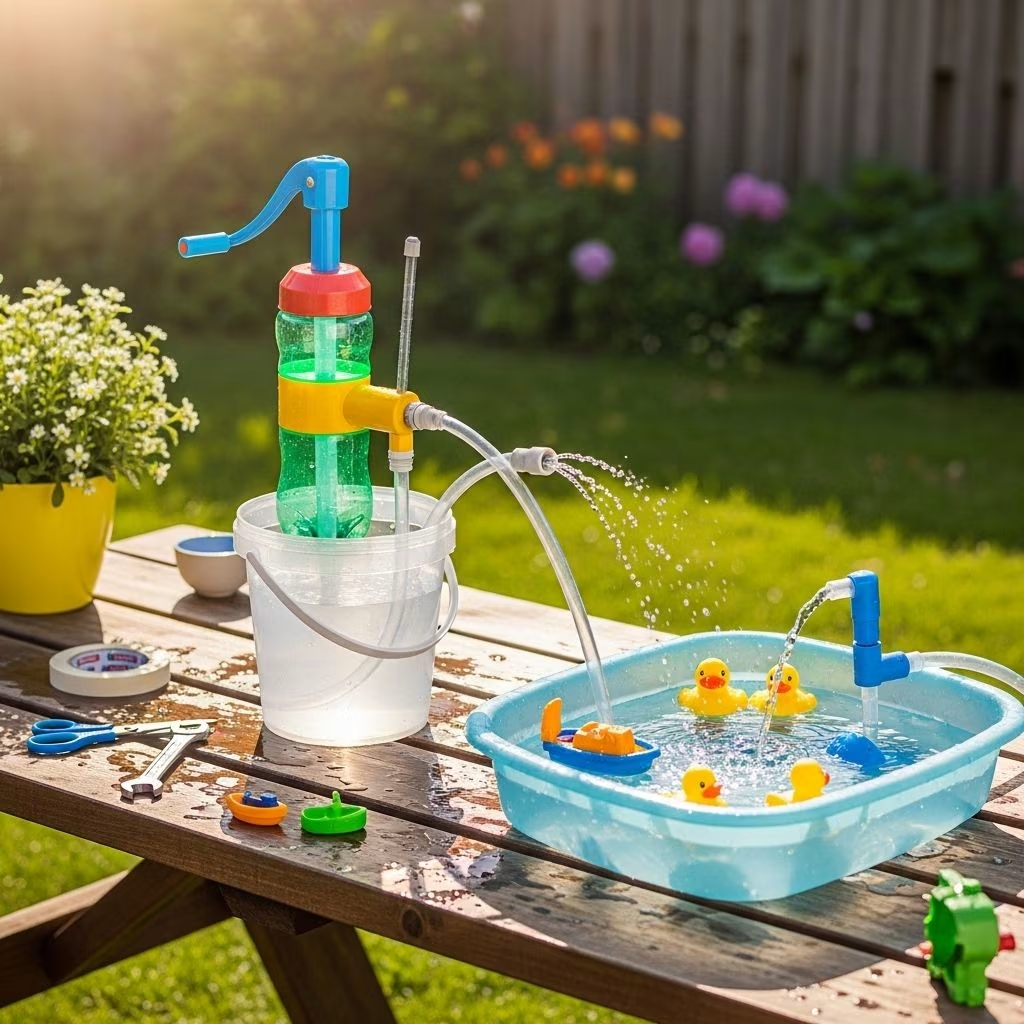
Creating a DIY water pump system for outdoor play transforms your backyard into an interactive learning environment where children can explore, experiment, and develop essential skills through water play. This project combines simplicity with functionality, allowing kids to access water independently without constantly running the outdoor faucet or bringing dirty hands into the house. Whether you’re building a standalone water station or integrating it into a mud kitchen, this comprehensive guide will walk you through everything you need to know.
Why Build a DIY Water Pump System
A DIY water pump system offers numerous advantages for families with active outdoor children. Traditional water access methods often prove inefficient and wasteful, with garden hoses left running or children tracking mud indoors to fill containers. A manual pump system solves these problems elegantly while providing additional developmental benefits.
The independence factor stands out as the primary advantage. Children from toddlers to teenagers can operate a manual pump system without adult supervision, fostering self-reliance and confidence. This independence extends playtime significantly, as kids no longer need to interrupt their activities to request water access. Parents benefit equally, enjoying uninterrupted time while children engage in constructive outdoor play.
Water conservation becomes remarkably easier with a pump system. Unlike hoses that deliver continuous flow regardless of actual need, manual pumps dispense only the amount of water children actively pump. This controlled dispensing prevents waste while teaching children about resource management and the effort required to access water.
The educational value of water pump systems extends beyond simple conservation lessons. Children develop fine motor skills through pumping actions, strengthen upper body muscles, and gain practical understanding of basic physics principles including pressure, flow, and gravity. The cause-and-effect relationship between pumping and water delivery provides tangible feedback that reinforces learning.
Essential Materials and Tools
Building a basic water pump system requires relatively few materials, most of which are readily available at hardware stores or online retailers. The core components remain consistent across different designs, though you can customize based on your specific needs and budget.
The water pump itself serves as the centerpiece of your system. Manual hand pumps designed for water dispensing work perfectly for this application. These pumps typically feature a threaded base that screws onto standard water jug openings and a hand-operated lever that creates pressure to move water through attached tubing. Look for pumps constructed from durable, weather-resistant materials that can withstand outdoor conditions and frequent use.
Water storage containers come in various sizes, with five-gallon jugs being the most popular choice. These jugs provide substantial water capacity while remaining manageable for adults to fill and move. The standard opening size on these jugs matches most manual pump threading, ensuring compatibility. Some builders prefer using large plastic bins or barrels for increased capacity, especially when serving multiple children or extended play sessions.
Tubing connects the pump to the water source and, in more elaborate setups, distributes water to multiple outlets. Silicone tubing in the 10mm x 13mm size provides excellent durability and flexibility while fitting securely onto standard pump outlets. The tubing should be food-grade and UV-resistant to prevent degradation from sun exposure.
For integrated installations within mud kitchens or water tables, additional materials include PVC pipes and fittings, black irrigation pipes, various inserts including tee joints and elbow connectors, plug inserts for fountain heads, and vinyl tubing for secure connections. Power tools needed for these more complex builds include drills with various bit sizes, jigsaws for cutting openings, hand saws or miter saws for pipe cutting, and markers for planning cuts.
Basic Water Pump Setup Instructions
The simplest water pump configuration requires minimal construction and can be completed in under ten minutes. This basic setup works perfectly for families wanting immediate functionality without extensive building projects.
Begin by selecting an appropriate location in your backyard. Choose a spot with relatively level ground that provides easy access for children while remaining visible from your typical supervision areas. Consider proximity to your water source for convenient refilling and ensure the location offers some shade during peak sun hours to keep the water reasonably cool.
Prepare your water container by thoroughly cleaning it if previously used. Remove any manufacturer wrapping or seals from the opening, ensuring the threads are clean and accessible. Fill the container with fresh water, leaving a few inches of space at the top to prevent overflow when the pump is inserted.
Attach the manual pump to the water container by carefully threading it onto the opening. Most pumps require several complete rotations to achieve a secure, leak-proof seal. Tighten firmly but avoid over-tightening, which could crack the plastic threads on the container.
Prime the pump by operating the handle several times without any tubing or outlets open. This action fills the pump mechanism with water and removes air pockets that could reduce efficiency. After priming, the pump should deliver water with each subsequent stroke of the handle.
Test the system by pumping water into a container. Check for leaks around the threaded connection and ensure water flows smoothly with reasonable effort. Adjust the pump if necessary, and demonstrate proper operation to your children before allowing independent use.
Advanced Water Table Integration
Integrating a pump system into a water table or mud kitchen creates a more elaborate play station with multiple features and outlets. This advanced project requires additional planning and construction but delivers impressive results that elevate outdoor play experiences.
Start by designing your plumbing structure using PVC or black irrigation pipe. A typical configuration uses tee joints and elbow connectors to create a manifold system that distributes water from a single pump to multiple fountain outlets. Cut pipe sections to appropriate lengths, keeping pieces relatively short to maintain adequate water pressure throughout the system.
Assembly of the plumbing structure works best with a clear plan. Lay out all components before beginning assembly to ensure proper fit and function. If using black irrigation pipe, soaking the pipe ends in hot water for thirty seconds before attaching inserts makes the process significantly easier. The temporary heat softens the plastic slightly, allowing inserts to slide in with less force.
Prepare your water table or mud kitchen surface by drilling holes for vertical fountain pipes and the pump connection. Mark hole locations carefully, considering the spacing needed for children to interact with each water source comfortably. Drill these holes slightly larger than your pipe diameter to allow for easy insertion and adjustment.
Create drainage in your table lid or top surface by drilling numerous small holes. These drainage holes prevent water from pooling on the surface, instead directing it back into the reservoir below. Position drainage holes at the lowest points of your surface, which may coincide with texture patterns or deliberate grading in the table design.
Install the pump through the designated opening, securing it with the threaded cap on the underside of the table. The pump body should rest firmly on top while the intake extends down into the water reservoir below. Connect the pump outlet to your plumbing structure using appropriately sized vinyl or silicone tubing, ensuring all connections are secure and leak-free.
Thread vertical fountain pieces through the prepared holes in your table surface, connecting them to the manifold below. Position these pieces to stand roughly vertical, making adjustments as needed before tightening all connections. The top of each vertical piece should extend several inches above the table surface to create effective water streams.
Drill small holes in the plug inserts that cap your vertical fountain pieces. Start with very small holes, as you can always enlarge them but cannot make them smaller. Test water pressure after drilling initial holes, then gradually increase hole size or add additional holes until you achieve the desired water flow. Some builders also drill holes along horizontal pipe sections to create additional water features.
Material Selection and Durability Considerations
Choosing appropriate materials significantly impacts the longevity and functionality of your water pump system. Outdoor exposure subjects all components to UV radiation, temperature fluctuations, and constant moisture, making material quality crucial for lasting performance.
Food-grade plastics provide the safest option for any components that contact water. These materials resist bacterial growth and avoid leaching chemicals into the water, important considerations when children will play with and potentially ingest small amounts of the water. Look for BPA-free designations and UV-stabilized formulations that resist degradation from sunlight.
Metal components should be stainless steel or another corrosion-resistant alloy. Standard steel or iron fittings will rust quickly in constant moisture, potentially staining surfaces and contaminating water. Brass fittings offer excellent durability and corrosion resistance, making them ideal for pump connections and hose fittings.
Tubing selection affects both functionality and lifespan. Silicone tubing excels in outdoor applications due to its flexibility across temperature ranges, resistance to UV damage, and inert properties that prevent chemical leaching. Reinforced vinyl tubing provides a budget-friendly alternative with good durability, though it may become stiff in cold weather and brittle after extended sun exposure.
For pump mechanisms themselves, look for models with simple, robust construction featuring few moving parts. Complex pumps with multiple seals and valves are more prone to failure and difficult to repair. The best outdoor water pumps use basic piston or diaphragm designs that children can operate easily while withstanding rough handling.
Creative Setup Ideas and Variations
Once you master the basic water pump system, numerous variations and enhancements can increase play value and educational opportunities. These creative adaptations transform simple water access into engaging learning stations.
The mobile water station mounted on wheels allows repositioning throughout your yard as sun patterns change or play moves to different areas. Attach locking casters to a wooden frame that holds your water container and pump, creating a portable unit that children can help move while adults control locking mechanisms.
Multiple fountain heads at varying heights accommodate children of different ages and create more complex water flow patterns. Tall fountains challenge older children to position containers for catching water, while shorter outlets allow toddlers easy access. Adjustable-height fountains using telescoping pipes provide ultimate flexibility as children grow.
Integrated sink basins in mud kitchens add realistic kitchen play elements. Cut an appropriately sized opening in your mud kitchen countertop using a jigsaw, then drop in a basin that rests on its lip. Position a fountain outlet above the basin to fill it, with drainage holes allowing water to return to the reservoir below for continuous recirculation.
The dual-container system uses separate clean water and gray water reservoirs. Fresh water pumps from one container for washing and drinking, while used water drains into a second container for easy disposal. This setup teaches water cycle concepts and emphasizes the difference between potable and non-potable water.
Measurement and math stations incorporate graduated containers, measuring cups, and scales near the water pump. Children practice pouring specific amounts, comparing volumes, and predicting outcomes while engaging with water play. Adding waterproof number cards or measurement guides reinforces mathematical learning.
Maintenance and Seasonal Care
Regular maintenance ensures your water pump system remains functional and hygienic throughout years of outdoor play. Establishing simple routines prevents problems and extends the life of all components.
Water quality management starts with complete water changes every few days during active use periods. Stagnant water develops algae, bacteria, and unpleasant odors that make the play station less appealing and potentially unhealthy. Empty old water onto landscaping rather than down drains, as the water contains no harmful chemicals and benefits plants.
Clean all surfaces and components weekly using mild soap and water. Scrub the interior of water containers with a long-handled brush, paying special attention to corners and the bottom where sediment accumulates. Rinse pump mechanisms thoroughly, operating the handle several times while rinsing to flush debris from internal passages.
Inspect tubing regularly for cracks, holes, or signs of degradation. Replace any damaged sections immediately to maintain water pressure and prevent leaks. Store extra tubing indoors to have replacement sections readily available when needed.
Winter storage in cold climates prevents freeze damage to pump mechanisms and containers. Drain all water completely from the system before temperatures drop below freezing. Remove pumps and store them indoors in a dry location. If possible, bring the entire water container indoors or at minimum, turn it upside down to prevent water accumulation and ice formation.
Spring preparation involves thorough cleaning of all components after winter storage. Inspect for any damage that occurred during storage and replace worn parts before the new play season begins. Test the pump mechanism to ensure it operates smoothly, lubricating any moving parts if specified by the manufacturer.
Safety Considerations and Supervision
While water pump systems are generally safe, proper setup and supervision practices prevent accidents and ensure positive play experiences. Understanding potential hazards allows you to mitigate risks effectively.
Drowning prevention remains the primary safety concern with any water feature. Five-gallon containers and small basins contain sufficient water to pose drowning risks for young children. Always supervise toddlers and preschoolers during water play, maintaining visual contact throughout play sessions. Secure lids on water reservoirs when not in use to prevent children from accessing standing water unsupervised.
Slip hazards develop around water play areas as surfaces become wet. Place your water pump system on grass or other textured surfaces rather than smooth concrete or wood that becomes slippery when wet. Consider adding rubber mats or textured grip tape in high-traffic areas around the pump.
Sharp edges on cut pipes or drilled holes can cause injuries. Smooth all cut edges with sandpaper or a file before assembly, and check regularly for any new sharp spots that develop from wear or damage. Cover exposed pipe ends with caps or plugs to eliminate pointed hazards.
Sun exposure affects both children and equipment. Position water stations in shaded areas when possible, or provide shade structures like umbrellas or canopies. The water itself can become uncomfortably warm in direct sunlight, reducing its appeal for play and increasing bacterial growth rates.
Teach children proper pump operation to prevent overexertion injuries. Demonstrate smooth, controlled pumping motions rather than aggressive jerking that could strain muscles or cause the pump to break free from its mounting. Set reasonable expectations about the effort required and encourage children to take breaks during extended play.
Cost Analysis and Budget Options
Building a water pump system accommodates various budget levels, from minimal investment basic setups to more elaborate installations with premium components. Understanding cost factors helps you plan an appropriate project for your financial situation.
The basic setup requires minimal investment, typically between twenty and forty dollars for a quality manual pump and five-gallon water jug. Many families find free or very inexpensive water containers from offices or gyms that use water cooler systems. The pump itself represents the primary expense, with prices ranging from fifteen dollars for basic models to fifty dollars for heavy-duty versions with enhanced durability.
Integrated water table installations cost significantly more due to additional materials and construction requirements. Budget for pipes, fittings, tubing, drilling supplies, and the table structure itself if building from scratch. Complete integrated systems typically cost between one hundred and three hundred dollars depending on size and complexity, though using reclaimed materials substantially reduces expenses.
Premium options include stainless steel components, commercial-grade pumps, and elaborate multi-station designs. These high-end systems can exceed five hundred dollars but offer superior durability and functionality that justifies the investment for families expecting years of heavy use.
Money-saving strategies help reduce costs without sacrificing quality. Scour local marketplaces for used water containers and building materials, check hardware store clearance sections for discounted plumbing supplies, and time purchases to coincide with seasonal sales. Many lumber yards offer free or very cheap scrap wood suitable for water table frames.
Educational Benefits and Learning Opportunities
Water pump systems provide rich learning experiences across multiple developmental domains. Understanding these educational benefits helps parents and educators maximize the value of water play activities.
Physical development accelerates through pump operation and water manipulation. The pumping action strengthens arms, shoulders, and core muscles while developing coordination between both hands. Pouring, scooping, and transferring water refines fine motor skills essential for writing and other precise tasks. Balance and spatial awareness improve as children position containers and move around the water station.
Cognitive growth occurs through experimentation and problem-solving. Children naturally test hypotheses about water flow, volume, and pressure, observing results and adjusting their actions accordingly. They develop understanding of cause and effect, basic physics principles, and mathematical concepts like measurement and comparison. The hands-on nature of water play makes abstract concepts concrete and memorable.
Scientific thinking emerges as children explore water properties. They discover concepts like surface tension, buoyancy, and dissolution through unstructured play. Adding various containers, funnels, and toys encourages systematic experimentation and observation, fundamental skills for scientific inquiry.
Social and emotional development flourishes in shared water play environments. Children practice cooperation, negotiation, and turn-taking as they share pump access and water resources. They experience the satisfaction of mastering pump operation independently, building confidence and self-efficacy. The calming properties of water play help regulate emotions and reduce stress.
Troubleshooting Common Issues
Even well-constructed water pump systems occasionally develop problems. Recognizing common issues and their solutions keeps your system functioning optimally with minimal downtime.
Weak water flow or complete pump failure often results from air locks in the system. Prime the pump again by operating it several times while ensuring the intake sits fully submerged in water. If problems persist, disconnect tubing and test the pump directly over a container to isolate whether issues lie in the pump mechanism or distribution system.
Leaking connections typically occur at threaded joints or tubing connections. Tighten threaded connections carefully, avoiding over-tightening that could crack plastic components. For tubing leaks, ensure you’re using the correct diameter tubing that fits snugly over outlet nipples. Replace any stretched or damaged tubing sections.
Difficulty pumping may indicate debris blocking the intake screen or internal passages. Disassemble the pump according to manufacturer instructions and clean all components thoroughly. Prevent future blockages by filtering water before adding it to the reservoir or using clean tap water rather than pond or rain water.
Uneven water distribution in multi-outlet systems suggests pressure imbalances or blockages in specific branches. Check that all fountain holes are appropriately sized, adjusting as needed to balance flow. Ensure no kinks exist in tubing runs and that all branches have similar lengths and numbers of outlets to maintain pressure equality.
Frequently Asked Questions
Q: How much water does a typical DIY water pump system hold?
A: Most systems use five-gallon containers, providing approximately nineteen liters of water. This capacity typically supports several hours of active play before requiring refilling, depending on the number of children and play intensity.
Q: Can I use rainwater in my water pump system?
A: Yes, rainwater works well for outdoor play stations. However, filter it through a fine mesh screen to remove debris that could clog pump mechanisms. Be aware that rainwater may develop algae more quickly than chlorinated tap water.
Q: At what age can children safely use a manual water pump independently?
A: Most children around three to four years old develop sufficient strength and coordination to operate manual pumps effectively. Always supervise younger children during water play regardless of their ability to operate the pump.
Q: How do I prevent mosquitoes from breeding in the water reservoir?
A: Change water completely every two to three days, as mosquito eggs require several days to hatch. Cover the reservoir with a tight-fitting lid when not in use, and add a small amount of vegetable oil to the water surface to prevent egg-laying.
Q: Can I leave my water pump system outdoors year-round?
A: In warm climates, yes, though regular cleaning remains essential. In areas with freezing temperatures, drain the system completely and store pump mechanisms indoors during winter to prevent freeze damage that could crack components.
Q: What type of pump works best for heavy use by multiple children?
A: Look for pumps with metal internal components rather than all-plastic construction. Models designed for commercial or marine use typically offer greater durability than consumer-grade options, justifying their higher cost for heavy-use situations.
Q: How can I make my water pump system more accessible for children with mobility challenges?
A: Install the pump at an appropriate height for wheelchair access, typically around thirty inches from the ground. Consider electric pump options activated by large, easy-to-press buttons rather than manual levers requiring significant strength and coordination.
Conclusion
Creating a DIY water pump system for outdoor play represents a manageable project that delivers substantial benefits for children’s development and family enjoyment. From simple standalone pumps requiring minimal investment and construction time to elaborate integrated water tables with multiple features, options exist for every skill level and budget. The independence these systems provide children, combined with water conservation and educational value, makes them worthwhile additions to any outdoor play space. By following proper construction techniques, selecting quality materials, and maintaining the system appropriately, your water pump will provide years of engaging outdoor play experiences that foster learning, physical development, and creative exploration.
References
- https://www.instructables.com/Water-Table-for-the-Kids/
- https://busytoddler.com/water-pump-for-kids/
- https://www.marriedandahouse.com/theblog/how-to-add-real-water-to-a-mud-kitchen
- https://www.cobberson.com/hand-pump-water-table-for-kids-learning-through-water-play/
- https://happyhooligans.ca/running-water-backyard-play-space/