DIY Simple Rain Gauge for Daily Outdoor Records
Observing and recording daily rainfall is an engaging way to connect with your environment, enhance weather awareness, and contribute useful data to science projects, gardening efforts, and local weather tracking. Building a simple rain gauge is a hands-on project perfect for individuals, families, educators, and anyone interested in learning about meteorology or monitoring local precipitation patterns. This guide details every step—from selecting materials to interpreting your readings—ensuring you create an accurate rain gauge for daily outdoor records.
Introduction to Rain Gauges
A rain gauge is a device designed to gather and measure the amount of liquid precipitation that falls over a set period. They have been essential instruments for meteorologists, hydrologists, gardeners, and citizen scientists ever since systematic rainfall measurement began. While commercial rain gauges are available, making your own simple rain gauge offers educational benefits and encourages daily engagement with the outdoors.
Importance of Measuring Rainfall
- Meteorology: Accurate rainfall measurement helps predict floods, droughts, and weather patterns.
- Gardening & Agriculture: Tracking rainfall informs watering schedules and soil health.
- Science Projects: Building a rain gauge develops skills in observation, data collection, and analysis.
- Community Science: Sharing measurements supports local weather databases and water management decisions.
Tools and Materials Needed
A basic rain gauge can be constructed from everyday materials found around the home. For enhanced accuracy, attention to calibration and setup is essential. Below are the recommended materials and tools:
- Clear, straight-sided plastic bottle (e.g., 2-liter soda bottle, or tall canning jar)
- Scissors or sharp knife (for cutting plastic)
- Small rocks or sand (for stability)
- Plastic or metal ruler (minimum 15 cm or 6 inches)
- Permanent marker
- Funnel (optional, for better water collection and reducing evaporation)
- Clear tape or masking tape
- Weather chart, notebook, or spreadsheet for data recording
Step-by-Step: How to Build a Simple Rain Gauge
Follow these instructions for a proven simple rain gauge design, ideal for daily records:
- 1. Prepare the Bottle
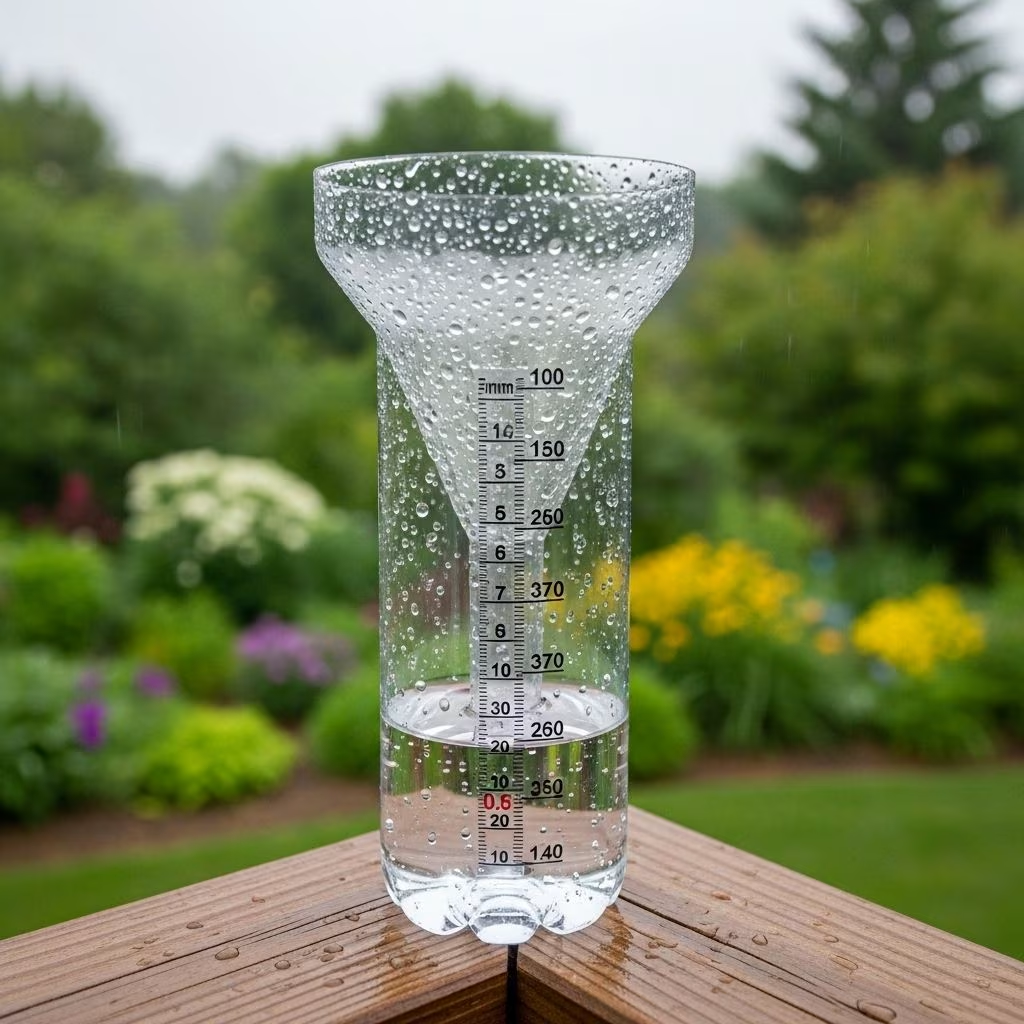
Choose a clear plastic bottle with straight sides. Use scissors or a knife to carefully slice off the top section, starting just as the bottle curves inward. Cover any sharp edges with tape for safety. - 2. Weigh Down the Base
Add a cup of small rocks, pebbles, or sand to the bottom of the bottle. This prevents tipping and ensures precise measurement from your baseline. - 3. Mark the Zero Line
The zero mark should be just above the layer of rocks. Using the ruler, align the ‘0’ carefully and draw a clear red line or apply a piece of tape as your baseline. - 4. Create the Measurement Scale
Position the ruler vertically along the outside of the bottle. Using your marker, mark increments every 5 millimeters (or 0.25 inch), labeling every 10 millimeters (0.5 inch) for easy reading. Cover the markings with clear tape to protect from rain. - 5. Add Water for Calibration
Pour enough water into the bottle to cover the rocks exactly up to the zero mark. This calibrates your gauge so the starting reading is zero. - 6. Install the Funnel
If available, invert the removed bottle top, cap off, to create a funnel. Secure it with tape or binder clips atop the bottle. This helps direct rainfall into the gauge and reduces evaporation. - 7. Setting Up the Gauge
Place your rain gauge on a perfectly flat outdoor surface in an open area—away from trees, roofs, or obstructions that could alter or block rainfall.
Tips for Improved Accuracy
- If possible, use a jar or container with a flat, straight edge—curved sides can distort measurements.
- Place multiple gauges in different spots to check consistency and correct for wind effects or splash.
- Periodically check for leaks, debris, or insects in the gauge.
Installation and Calibration
Proper installation and calibration are crucial to obtaining reliable rainfall readings. Here are important considerations:
- Location: Select an open, level area exposed directly to sky. Avoid eaves, trees, fences, and barriers that can either block or add runoff into the gauge.
- Level Setup: Use a spirit level or sight to ensure the gauge sits vertically. Tilted gauges can give inaccurate values.
- Calibration: Check that your zero mark aligns with the water surface. To verify, pour a measured amount of water (e.g., 10 mm with a syringe) and ensure the reading matches the expected increment.
- Maintenance: Empty the gauge after each measurement and check for any accumulation that might obstruct the funnel.
Recording and Tracking Rainfall
Systematic recording transforms rainfall measurement into valuable data. Follow these best practices:
- Check the gauge daily, ideally at the same time, preferably in the morning.
- Record the date, time, and rainfall amount in a notebook, chart, or digital spreadsheet.
- Reset the gauge to zero after each reading by emptying the bottle.
- Use consistent units—millimeters or inches.
- If gauge overflows, empty, record the value, and continue collecting until rain stops. Add up totals for final daily record.
Sample Rainfall Data Table
| Date | Time | Rainfall (mm) | Notes |
|---|---|---|---|
| 2025-10-01 | 08:00 | 12 | Light overnight shower |
| 2025-10-02 | 08:00 | 0 | No rain observed |
| 2025-10-03 | 08:00 | 35 | Heavy thunderstorm |
Advanced DIY Rain Gauge Options
For those seeking enhanced data logging or electronic readings, consider these advanced approaches:
- Arduino-Based Tipping Bucket Rain Gauge: Incorporate a tipping mechanism, hall-effect sensor, and Arduino microcontroller. Each tip counts a set volume, providing digital records and real-time display. Requires components such as threaded rods, magnets, sensors, and basic coding knowledge.
- Wireless Data Logging: Attach a WiFi or Bluetooth module to automate rainfall uploads to a cloud database or smartphone.
- 3D Printed Parts: Create custom containers, mounting frames, or funnel shapes for optimal collection and resilience in outdoor conditions.
For most users, the simple bottle-based rain gauge is sufficient for daily observation and record keeping.
Troubleshooting Common Issues
Rainfall measurement accuracy can be impacted by several factors:
- Evaporation: Using a funnel or lid reduces water loss, especially in hot climates.
- Wind Effects: Shield the gauge from prevailing winds without blocking rainfall.
- Obstructions/Run-off: Ensure placement away from overhanging structures and dripping branches.
- Leaking or Cracks: Regularly inspect and seal any leaks with waterproof tape.
- Measurement Errors: Use a precise ruler and avoid parallax error when reading water level. Make marks clear and easy to read in low light.
Applications of Rainfall Data
Consistent rainfall data has numerous practical uses:
- Gardening/Farming: Schedule irrigation, monitor drought, protect sensitive crops.
- Flood Prediction: Alert communities to rising water tables or saturated soil.
- Scientific Experiments: Analyze trends, compare annual precipitation, study local climate variations.
- Environmental Stewardship: Contribute observations to citizen science platforms, local environmental groups, or schools.
- Home Projects: Support planning for rainwater harvesting systems or landscaping.
Frequently Asked Questions (FAQs)
Q: Why does a rain gauge need to be in an open area?
A: Obstructions such as trees, roofs, and walls can block rainfall or cause extra water to drip into the gauge, leading to inaccurate measurements.
Q: How often should I check and record my rain gauge readings?
A: For daily records, check your rain gauge at a consistent time each day—morning is most common. After heavy rain, consider more frequent checks to avoid overflow.
Q: What is the best unit to record rainfall?
A: Rainfall is typically measured in millimeters or inches. Choose one unit and use it consistently in your records.
Q: How do I make sure my rain gauge is accurate?
A: Use a clear, straight-sided container, precisely mark increments, calibrate the zero line after adding rocks and water, and ensure the gauge is level and unobstructed.
Q: Can a DIY rain gauge compare to commercial models?
A: With careful calibration and proper setup, homemade rain gauges can offer accuracy sufficient for educational and hobbyist uses, though professional models may provide higher precision and durability.
Additional Resources
- Local weather service guidelines for citizen rainfall measurement
- Online weather chart templates for recording precipitation
- Community science initiatives collecting daily rainfall data
- Instructional videos and downloadable worksheets for building gauges (search for “Build a Rain Gauge” on YouTube for visual guidance)
Summary
Building a DIY simple rain gauge is a straightforward, low-cost, and educational project. Beyond fostering scientific inquiry, it offers a practical way to monitor the weather, improve gardening and farming decisions, and contribute meaningful data to wider community science projects. By following the steps and guidance laid out in this comprehensive article, anyone can reliably measure—and enjoy—the rhythms of local rainfall.
References
- https://manoa.hawaii.edu/sealearning/sites/default/files/3ESS_Rain%20Gauge_Teacher%20Guide_mm_1.pdf
- https://www.instructables.com/DIY-Arduino-Rain-Gauge/
- https://www.youtube.com/watch?v=8qLael2CSKs
- https://www.amnh.org/explore/ology/earth/make-your-own-weather-station/make-a-rain-gauge
- https://www.communityplaythings.com/resources/articles/making-a-rain-gauge
- https://www.youtube.com/watch?v=btNEP3Z8n3I
- https://www.youtube.com/watch?v=Rh18GMwwV4M