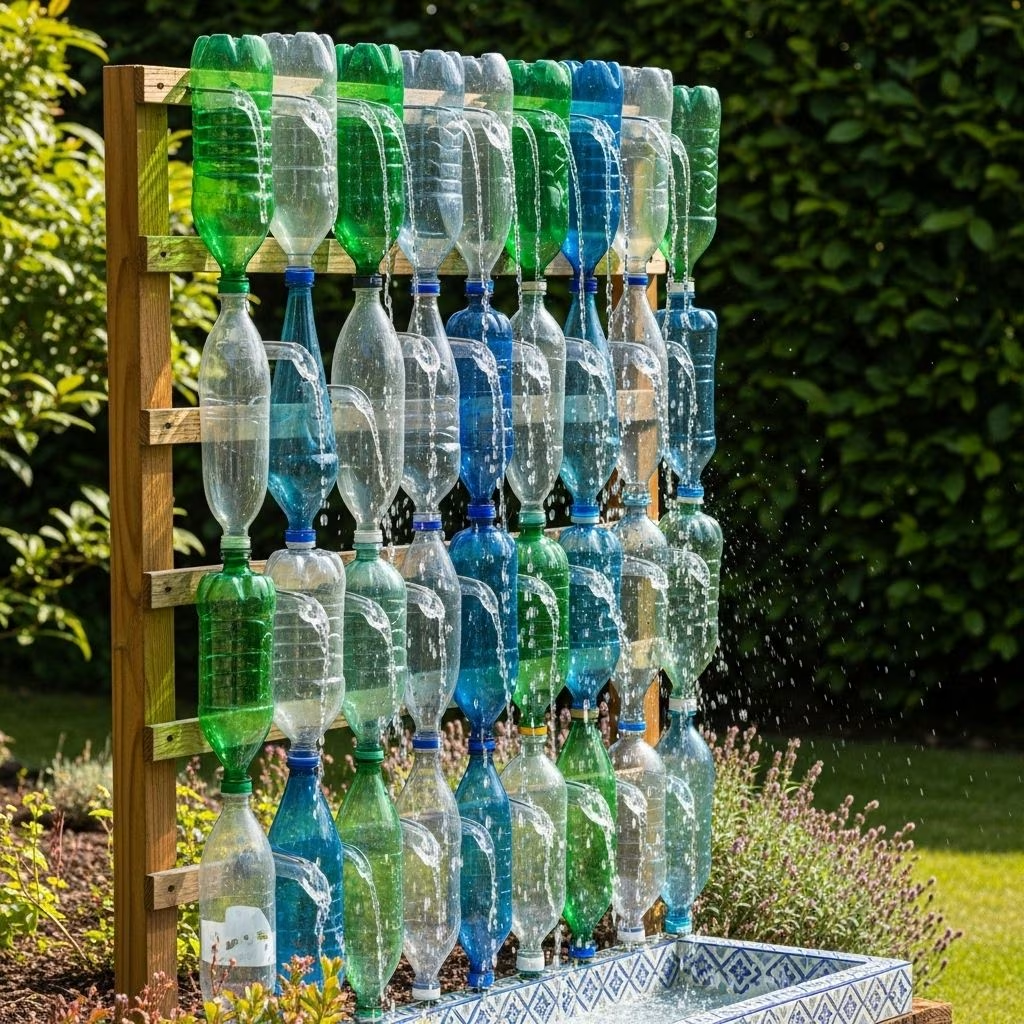
Transform your garden, patio, or play space into a soothing, interactive oasis by building a DIY outdoor water wall using recycled bottles. Not only does this project contribute positively to the environment by reusing plastic, but it also adds a dynamic visual and auditory element to your outdoor space—delighting children and adults alike.
Introduction: The Allure of Water Walls
Water walls captivate with the combination of movement, sound, and sparkling reflections. They can offer a peaceful retreat, a play-space innovation, or a striking garden focal point. By using recycled plastic bottles, you’re not just crafting a beautiful feature—you’re practicing sustainability in action. Whether you’re seeking a serene atmosphere or an educational project for kids, this guide provides everything you need for a successful DIY build.
Benefits of a Recycled Bottle Water Wall
- Eco-Friendly: Reduces landfill waste by giving bottles a new purpose.
- Engages Children: Offers a fun, hands-on STEM learning experience about water flow and conservation.
- Cost-Effective: Uses materials commonly found at home and in recycling bins.
- Enriches Your Outdoor Space: Adds a visually dynamic and relaxing element to gardens or patios.
- Adaptable: Easily scaled in size—from simple backyard play walls to ambitious decorative installations.
- Water Conservation: Can incorporate systems for capturing and reusing water, teaching eco-conscious practices.
Materials & Tools Needed
Before you start, gather all necessary materials. This ensures efficiency and safety throughout the project.
- Recycled plastic bottles (various sizes: water, soda bottles, etc.)
- Sturdy backing (options include old fence panel, plywood, lattice, or chain link fence)
- Fastening materials (zip ties, wire, staple gun, or heavy-duty twist ties)
- Sharp scissors or utility knife
- Drill or nail (for making holes in bottles, if needed)
- Buckets or tubs (water catchment under the wall for reuse)
- PVC pipe, garden hose, or pool hose (optional) for channeling water
- Decorative materials (acrylic paint, waterproof markers, LED lights, pebbles, faux plants)
- Small water pump (optional, for continuous flow)
- Cement or strong adhesive (optional) for permanent installations
Additional materials may be required for larger, permanent, or illuminated designs, such as a 12-volt DC water pump and LED lights.
Planning Your Water Wall Design
Think about location, scale, and purpose before assembling materials. Proper planning ensures your water wall functions well and fits your outdoor space.
- Placement:
- Choose a wall or fence with easy water access (garden hose or watering can).
- Prefer a shaded or semi-shaded area to reduce algae growth and UV degradation.
- Size:
- For children, waist-high works best for interactive play.
- For decorative features, customize size to your outdoor wall space.
- Aesthetics & Functionality:
- Include multiple bottles for varied routes and cascades.
- Incorporate curves (using hoses or bent bottles) for dynamic water flow.
- Add clear containers at the bottom to catch and recycle water.
- Structure:
- Freestanding frame or existing fence/panel for support.
- Consider folding or modular options for winter storage.
Step-by-Step Instructions
Step 1: Prepare and Clean the Bottles
- Gather bottles of various shapes and sizes; remove labels for a cleaner look.
- Wash with soap and water to prevent mold and odor.
- Let bottles dry thoroughly before use.
Step 2: Cut and Modify Bottles
- Using sharp scissors or a utility knife, cut windows or remove bottoms from bottles to allow water flow.
- For cascading effects, angle cuts or use two-liter bottles cut in half to form chutes.
- Drill or poke drainage holes in bottle sides or caps where needed to modulate the flow.
Step 3: Arrange Bottles and Components
- Lay out the bottles on the ground or on your backing to plan water flow sequence before attaching.
- Consider staggered heights and overlapping bottles for a longer water run.
- Test with small amounts of water to ensure desired flow and catchment.
Step 4: Attach Bottles Securely
- Attach to backing/fence using zip ties, wire, or staple gun (as appropriate to your structure and material).
- Make sure each bottle is angled so water moves smoothly to the next container or hose.
- For lattice or chain link, bottles can be easily tied through punched holes.
Step 5: Create the Water Flow Path
- Start from the top and let water flow through each bottle or chute to the bottom.
- Use hoses or curved bottles for turns in the path, or to direct water where needed.
- Buckets, bins, or shallow trays at the base collect the water for recycling.
Step 6: Add Decorative Touches (Optional)
- Paint bottles or decorate with permanent, waterproof markers for colorful flair.
- Embed pebbles, sand, or small plants along the water route for natural aesthetics.
- Install waterproof or solar LED lights for evening enjoyment.
- Use clear sealant sprays to help maintain color outdoors.
Step 7: Test and Edit
- Gently pour water from a jug or use a hose at the top to test the full system.
- Observe the flow, fix leaks, adjust bottle angles, or drill more holes as needed.
- Ensure water is being caught properly at the base and, if recycling, plan how to refill the top.
Step 8: (Optional) Add a Pump for Continuous Flow
- If you desire a nonstop water feature, install a small, submersible water pump in the collection bin to return water to the top bottle via tubing or hose.
- Make sure to use a safe, outdoor-rated, low-voltage pump and protect electrical connections from the elements.
Safety Tips and Sustainability Considerations
- Supervise young children during construction and play, especially when cutting plastic or operating pumps.
- Round off sharp edges on bottles with sandpaper or by using duct tape over cut areas where needed.
- Use non-toxic paints and adhesives appropriate for outdoor use.
- Keep electrical equipment away from standing water and secure all connections against rain.
- Clean and maintain the system regularly to prevent algae and blockages.
- When the installation has run its course, dismantle and recycle components responsibly.
Creative Customization Ideas
- Theme Designs: Use blue, green, and clear bottles to mimic the look of streams, or paint with vibrant outdoor motifs.
- Edutainment: Integrate water wheels, small mills, or pinwheels for added movement and learning.
- Nighttime Display: Add LED lighting inside bottles for a glowing waterfall effect.
- Nature Integration: Plant moss, succulents, or creeping vines along the wall for a living waterscape.
- Sound Variation: Alter bottle positions and sizes to create different drips, splashes, and trickling sounds.
Maintenance and Troubleshooting
Keep your water wall looking and functioning its best with simple upkeep.
- Empty and rinse bottles and catchment bins weekly to avoid algae and odor.
- Check for clogs caused by debris or mineral deposits; clear out bottles with a long brush or running water.
- Inspect for leaks and reseal or reposition bottles as necessary.
- If using a pump, clean filter regularly according to manufacturer’s instructions.
- Replace faded or broken bottles each season for safety and appearance.
- In winter, dismantle or cover the system to protect from frost and UV.
Frequently Asked Questions (FAQs)
Q: How many bottles do I need for a water wall?
Typically, 6 to 12 bottles are sufficient for a simple children’s water wall; more bottles and larger sizes allow longer, more decorative flows for adult garden features.
Q: Can I use glass bottles instead of plastic?
Plastic is safest and easiest to cut and modify; glass can be dangerous if broken and isn’t recommended for play or outdoor use.
Q: Will paint or marker decorations last outdoors?
Colors may fade due to sun and weather. Seal painted bottles with a clear, outdoor-safe spray sealant to maximize durability.
Q: How do I keep the water clean?
Use filtered or rainwater where possible, clean system parts regularly, and empty catchment bins when not in use to prevent microbial growth.
Q: Can I make a portable water wall?
Yes. Build smaller frames with a freestanding backing and use lightweight bottles to ensure easier relocation and storage.
Q: Are electric pumps safe for outdoor water walls?
Yes, provided they are waterproof, suitable for outdoor use, and properly protected from rain. Always supervise use around children and unplug during storms.
Conclusion: Enhance Your Space Sustainably
Creating a DIY outdoor water wall using recycled bottles is a sustainable, engaging, and customizable project suitable for any skill level. Whether aiming to entertain children, enrich your garden, or simply upcycle plastic waste, follow these steps to build a water wall that relaxes, educates, and impresses—all while modeling real-world eco-responsibility.
References
- https://www.youtube.com/watch?v=9sIj47oimrA
- https://happyhooligans.ca/water-wall/
- https://www.creativegreenliving.com/2015/05/make-recyled-water-bottle-garden-art.html
- https://www.youtube.com/watch?v=xq0HoQiINrk
- https://www.youtube.com/watch?v=6hyl7GZciZ0
- https://www.houzz.com/discussions/1998550/do-it-yourself-wall-o-water