Chocolate Mint Mini-Bites: A Step-by-Step Holiday Recipe
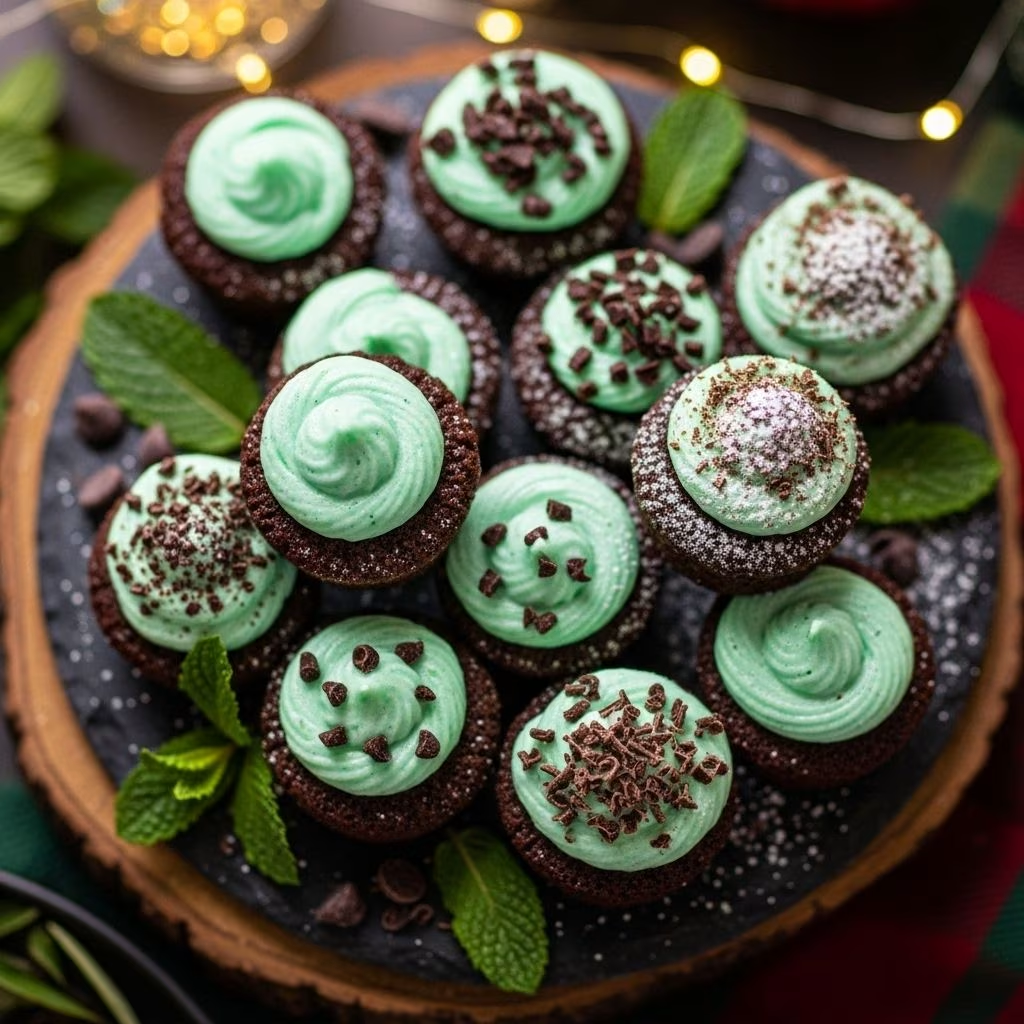
Looking for a crowd-pleasing holiday treat that’s easy to make, stays moist for days, and brings together the irresistible flavors of chocolate and mint? These Chocolate Mint Mini-Bites are the answer. Adapted from classic brownie bite recipes and topped with a creamy mint chocolate glaze, they’re a festive favorite perfect for Christmas, parties, or any dessert table.
Why You’ll Love Chocolate Mint Mini-Bites
- Irresistible flavor: The combination of rich brownie and cool mint glaze makes every bite a delight.
- Perfect texture: They’re moist, soft, and not too sweet, with a crisp minty finish.
- Make ahead: Thanks to the glaze, they stay fresh and delicious for several days in an airtight container.
- Bite-sized: Mini-muffin pans ensure portion-perfect, pop-in-your-mouth treats.
Ingredients You’ll Need
Chocolate Mint Mini-Bites require just a few simple ingredients, most of which you may already have in your pantry. Andes mints provide both the minty infusion and the beautiful, decorative topping.
| Ingredient | Amount | Notes |
|---|---|---|
| Andes Mints | 50 whole | Unwrap and divide as directed below. |
| Butter | 1 stick (1/2 cup) plus 1 Tbsp | For batter and glaze. |
| Sugar | 1 cup | Granulated. |
| Unsweetened Chocolate | 2 oz. | Melted for the batter. |
| Eggs | 2 whole | Room temperature preferred. |
| All-Purpose Flour | 3/4 cup | Sifted for best texture. |
| Mint Extract | 1/4 tsp. | Optional for stronger mint flavor. |
| Bittersweet Chocolate | 1 oz., chopped fine | For the glaze. |
Step-by-Step Instructions
- Preheat & Prep:
- Preheat oven to 325°F (163°C).
- Generously spray a mini muffin pan with baking spray to prevent sticking.
- Melt the Chocolates:
- Melt 2 oz. of unsweetened chocolate in a microwave-safe bowl.
- Immediately stir in 8 Andes mints until fully melted and smooth. Let cool slightly.
- Create the Batter:
- Cream together 1 stick of butter and 1 cup sugar in a mixer.
- Beat in eggs one at a time, scraping bowl between additions.
- Slowly drizzle in the cooled chocolate/mint mixture while mixing on low.
- Gradually add 3/4 cup flour, mixing until just combined.
- Stir in 1/4 tsp mint extract if a stronger flavor is desired.
- Portion & Bake:
- Using a tablespoon or cookie scoop, spoon batter into the mini muffin tins. Don’t overfill—aim for just under the rim.
- Bake for 13–15 minutes, until set and a toothpick comes out clean.
- Invert muffin pan onto a cooling rack and let the bites cool completely before glazing.
- Prepare the Mint-Chocolate Glaze:
- Unwrap and combine 25 Andes mints with 1 tablespoon of butter and 1 oz. finely chopped bittersweet chocolate in a bowl.
- Microwave for about 45 seconds, then stir until smooth.
- Coat the Mini-Bites:
- Dip the top (the wider base) of each brownie bite into the glaze, or spoon glaze generously over each one.
- Allow the glaze to set slightly before sprinkling the tops with finely chopped Andes mints (from the remaining mints).
- Quick Set Option:
- Place glazed bites in the freezer for 10 minutes to help the coating set quickly and make handling easier.
Tips for Recipe Success
- Don’t overfill your muffin pan: Overfilled cups will produce uneven edges; for uniform bites, keep portions just below the rim.
- Use real Andes mints: They melt smoothly and give the authentic, creamy mint flavor.
- Make ahead: Because of the glaze, these mini-bites stay moist and can be made several days in advance—perfect for parties.
- Adjust mint flavor: Stir in extra mint extract for an extra burst or leave it out for a milder flavor.
Serving Suggestions
- Festive platters: Arrange as part of a colorful dessert tray with peppermint bark, sugar cookies, or holiday truffles.
- Gift boxes: Place mini-bites in decorative cupcake liners and box them up for a sweet homemade gift.
- Party bites: Set out at gatherings for easy, mess-free nibbling—no fork required!
Storage and Make-Ahead Tips
- Keep mini-bites in an airtight container at room temperature; they’ll remain fresh and soft for several days thanks to the glaze.
- For longer storage, freeze in a sealed container (separate layers with parchment paper) for up to three months. Thaw at room temperature before serving.
Recipe Variations
- Classic version: Skip the mint for a pure chocolate brownie bite; top with chocolate glaze and festive sprinkles instead of chopped mints.
- Nutty twist: Fold in chopped pecans, walnuts, or almonds to add crunch to each bite.
- Extra creamy glaze: Swirl in a bit of cream cheese with the glaze for a mellow mint flavor.
FAQs: Chocolate Mint Mini-Bites
Q: Can I make these gluten-free?
A: Yes! Substitute a trusted 1:1 gluten-free flour blend for the all-purpose flour. Ensure your chocolate and mints are gluten-free as well.
Q: What’s the best way to melt the mints and chocolate?
A: Microwave in short bursts (30–45 seconds), stirring each time to avoid scorching. Stir until smooth. You can also use a double boiler on the stovetop for more control.
Q: Do these need to be refrigerated?
A: Not necessary if you plan to eat them within 2–3 days. For longer freshness, refrigerate in an airtight container (especially in hot or humid weather).
Q: Can I use another type of mint candy instead of Andes mints?
A: Andes mints are ideal for their texture and ability to melt smoothly, but other soft chocolate-mint candies can be substituted in a pinch.
Q: My bites baked over the edge and look rough. What went wrong?
A: Overfilling the mini muffin cups can lead to overflow. Use just enough batter to fill each cup below the rim for neat, uniform bites.
Decorating Mini-Bites: Ideas & Inspiration
- Chopped Andes topping: Sprinkle extra-finely chopped Andes over glazed bites for signature color and crunch.
- Colorful sprinkles: For birthdays or non-holiday treats, top with bright sprinkles instead of mints.
- Festive presentation: Use miniature cupcake liners in red, green, or gold for seasonal flair.
- Drizzle: Once glaze has set, add a white chocolate drizzle for extra contrast.
Troubleshooting & Expert Tips
- Sticky Bites: If bites stick to the muffin pan, use a mini offset spatula to gently loosen or line bottoms with small parchment rounds prior to baking.
- Setting Chocolate: If the glaze is too thin, allow it to cool a bit more before dipping bites or chill bites longer after glazing.
- Uniform Shape: Use a small cookie scoop for even portions; this prevents overflow and keeps all bites uniform in size.
- Freezer tip: Freezing briefly makes chocolate set faster and produces sharp, glossy tops for a polished look.
Nutritional Information (per mini-bite, approximate)
| Nutrient | Amount |
|---|---|
| Calories | 90 |
| Fat | 5g |
| Carbohydrates | 11g |
| Sugar | 9g |
| Protein | 1g |
Nutritional values are approximate and will vary depending on specific brands and amounts used.
More Holiday Desserts to Try
- The Best Cookies Filled with Nutella
- Pumpkin Bars with Spiced Cream Cheese Frosting
- Caramel Desserts for the Sweet Tooth
- Homemade Cream Cheese Frosting
- Dr Pepper Sheet Cake
- Confetti Birthday Cake
- 10-Minute Pumpkin Dip
Final Thoughts
Bake up a batch of these crowd-pleasing Chocolate Mint Mini-Bites and watch them disappear! Whether for holiday gifting, Christmas parties, or an everyday treat, this recipe delivers festive flavor and homemade comfort in every bite.