How to Pack a Cooler: Foolproof Strategies For Adventure, Camping & Travel
Packing a cooler well is an art form that guarantees your food stays fresh, safe, and appetizing for the duration of any trip, from summer picnics to cross-country road adventures. Proper technique prevents soggy sandwiches, warm drinks, and spoiled groceries. This comprehensive guide covers every essential step—from pre-chilling to advanced packing methods—to help you pack a cooler like a pro.
Why Proper Cooler Packing Matters
The way you pack your cooler directly affects food safety and enjoyment. Correct packing maintains cold temperatures longer, keeps food dry, and reduces waste, whether you’re camping, road tripping, or hosting an outdoor event.
- Preserve Freshness: Correct layering keeps meat, dairy, and perishables safe from spoilage.
- Prevent Cross-Contamination: Separating items helps avoid raw foods interacting with ready-to-eat ones.
- Maximize Cooler Space: Smart packing means more room for essentials and better cooling efficiency.
Step-by-Step: Packing Your Cooler for Maximum Chill
1. Start With the Right Cooler
A quality cooler sets the foundation for success. Hard-sided coolers offer superior insulation, while soft-sided versions are lighter and ideal for short trips. Features to prioritize:
- Good insulation thickness keeps cold air trapped longer.
- A tight, reliable seal prevents heat intrusion.
- Drain plug for easy water removal.
2. Pre-Chill Everything
Before packing, refrigerate or freeze your foods, beverages, and cooler itself. Pre-chilling means less ice is devoted to lowering temperatures and more to maintaining them.
Tips:
- Refrigerate drinks and perishables overnight.
- Place a bag of “sacrificial ice” in the cooler for several hours to pre-cool, then discard the ice before packing.
- Use frozen water bottles—these double as cold packs and drinking water as they melt.
3. Prep and Package Food
Remove excess packaging to reduce waste and bulk. Repackage food into airtight containers or resealable plastic bags.
Best practices:
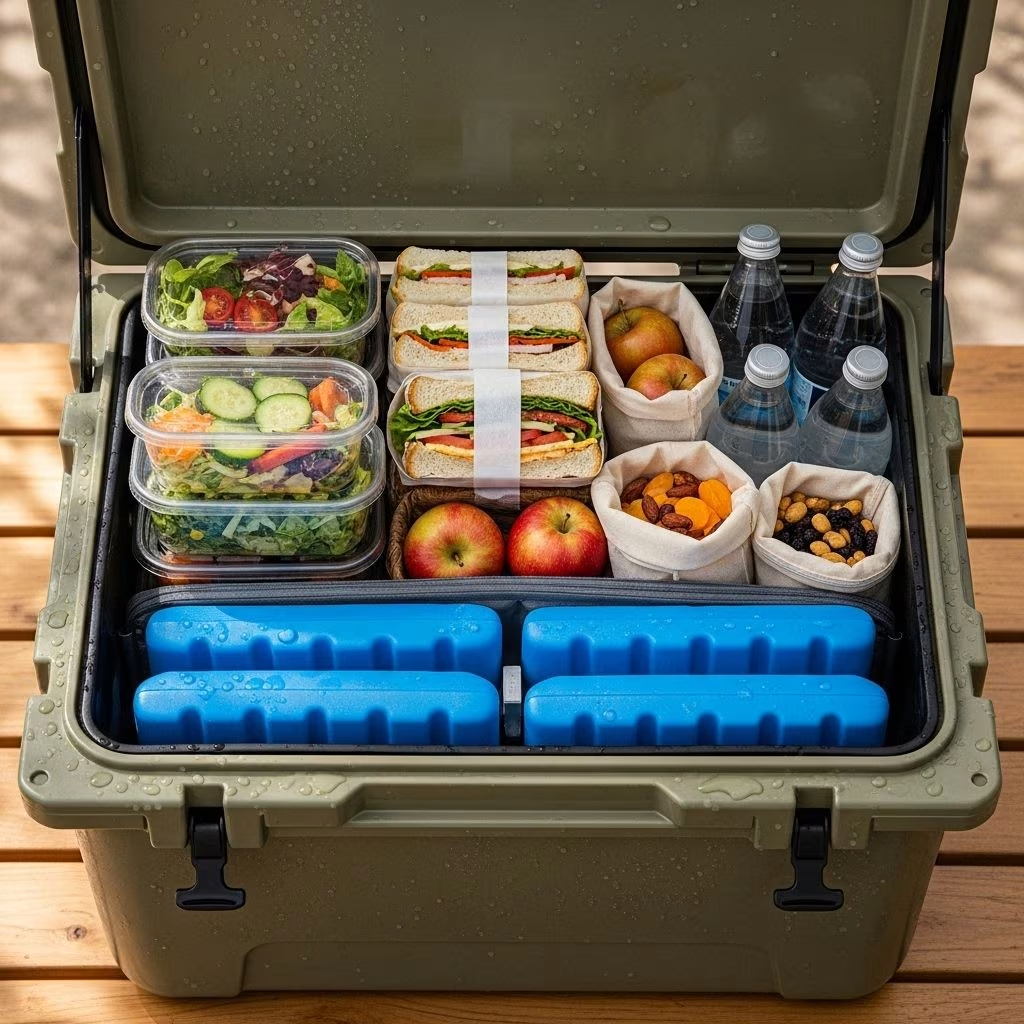
- Airtight containers prevent water intrusion and keep food dry.
- Divide food by meal and label containers for easier, faster access.
- Wrap meats separately to prevent leaks and contamination.
4. Layer Ice Strategically
Use different types of ice for optimal cooling:
- Block ice goes at the bottom—it melts slowly and forms a stable cold foundation.
- Cubed or crushed ice fills gaps and cools quickly but melts faster.
- Frozen gel packs work well for filling awkward spaces and keeping temperatures even.
| Type of Ice | Best Use | Melt Speed |
|---|---|---|
| Block Ice | Bottom layer, long trips | Slow |
| Cubed/Crushed Ice | Fill gaps, quick cooling | Fast |
| Frozen Gel Packs | Top/between layers | Moderate |
| Frozen Water Bottles | Top layer, drinkable water | Slow |
5. Smart Layering: The Key To Longevity
- Bottom Layer: Block ice, frozen items, and raw meats (helps keep them at the coldest temperature).
- Middle Layer: Dairy, pre-cooked meals, and other perishables in sealed containers.
- Top Layer: Items consumed first or more frequently (drinks, snacks).
- Fill all gaps with cubed ice or gel packs to minimize air pockets—air accelerates melting.
6. Organization for Quick Access
Reduce cooler open-time to prevent warm air from entering:
- Place the most frequently used items on top or in external pockets.
- Organize contents by meal (e.g., breakfast, lunch, dinner grouped)
- Pack beverages separately if possible to avoid frequent opening of the main food cooler.
Essential Tips for Cooler Success
Keep It Dry and Clean
- Food should never float in meltwater—use racks or waterproof containers to keep dry goods above ice
- Store cooler in a shaded location to reduce heat exposure
- Drain excess water daily to maintain ice efficiency
- Clean cooler before and after every trip to avoid odors and bacteria
Packing Without Ice: Alternative Cooling Methods
- Pre-chill food and cooler as much as possible before loading up
- Wet towels or cloths layered between foods and on top keep temperatures lower
- Line cooler with aluminum foil for additional insulation; especially helpful for keeping raw meats cold
Advanced Hacks & Pro Recommendations
- Use cooking racks: Place metal racks above the ice to keep food dry.
- Seal with foam sheets: Add a foam layer above the packed goods for extra insulation.
- Fill to capacity: Less air inside means slower ice melt—pack your cooler as full as you can.
- Ratio of ice to contents: A general rule is 2:1 (ice to food/drinks).
Common Mistakes to Avoid
- Leaving air pockets: Fill all available space with ice or pre-chilled goods to prevent quick melt.
- Not separating raw and ready-to-eat foods: Always use separate containers or sections to reduce risk of contamination.
- Ignoring food rotation: Place items you’ll eat last at the bottom or farthest from access.
- Packing at the wrong time: Delay packing until the very last moment before leaving.
Storing Gear When Not in Use
When your trip is over, use your cooler for off-season gear storage—store camp stoves, utensils, and kit inside. This keeps gear organized and ready for your next outing.
Expert Cooler Packing Checklist
- Choose correct size and type of cooler.
- Thoroughly clean and pre-chill cooler.
- Pre-chill all food and drink items before packing.
- Repackage food in airtight containers.
- Organize food by meal or type.
- Layer block ice at the bottom; fill with ice packs and cubed ice.
- Store perishables at the bottom, frequently used items on top.
- Fill all air gaps with ice or chilled goods.
- Pack drinks in a separate cooler if space allows.
- Store cooler in shade and avoid frequent opening.
Frequently Asked Questions (FAQs)
How long will ice last in a cooler?
Ice typically lasts 1-3 days in most coolers, but can be extended to 5+ days in premium, insulated models when pre-chilled and packed correctly.
Should drinks and food be packed together?
It’s best to separate foods and drinks if possible. Drinks are accessed more frequently, which lets warm air in and risks warming the food section.
How do I prevent food from getting soggy?
Use waterproof containers, metal racks, or sealable bags to keep food elevated above melting ice. Drain water regularly to avoid soggy results.
Can I use alternatives to ice?
Yes. Frozen gel packs, frozen water bottles, pre-chilled towels, and aluminum foil lining are effective options for moderate trips or short outings.
How do I keep my cooler cold for a week?
Start with a premium cooler, use blocks of ice, freeze everything possible before packing, fill all gaps, and minimize the number of times you open the cooler. Store it in shade for best results.
Final Thoughts
Packing a cooler is more than just tossing in some ice and drinks. With the right techniques—layering, pre-chilling, airtight containers, and careful organization—you’ll keep food safe, beverages frosty, and waste minimal throughout any adventure. Refer to this guide to make every camping, road trip, or outdoor occasion memorable and refreshingly cool.
References
- https://koa.com/blog/your-cooler-packing-checklist-2/
- https://www.hipcamp.com/journal/camping/how-to-pack-a-cooler-for-camping/
- https://www.youtube.com/watch?v=L-C1S0-ECKY
- https://www.countryliving.com/shopping/g20665764/camping-checklist/
- https://www.youtube.com/watch?v=bKdFWDglQQs
- https://www.countryliving.com/shopping/g65499677/best-camping-gear/