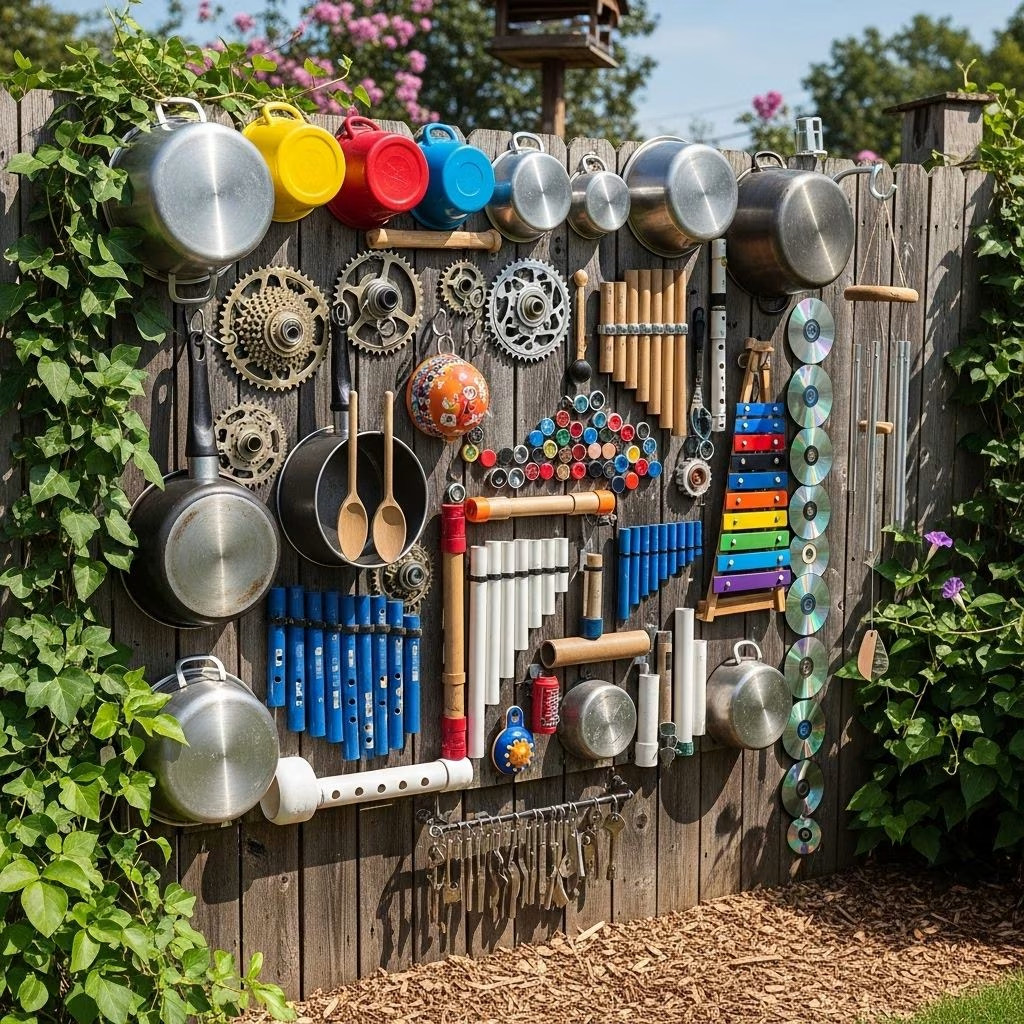
Creating a permanent outdoor music wall from recycled items transforms your backyard into an interactive musical playground while promoting sustainability and creativity. This comprehensive guide will walk you through every step of building a durable, weather-resistant music wall that provides endless entertainment for children and adults alike.
Understanding Outdoor Music Walls
An outdoor music wall is an interactive installation featuring various objects that produce sound when struck, scraped, or manipulated. Unlike temporary setups, a permanent music wall is designed to withstand outdoor conditions year-round, requiring careful material selection and proper weatherproofing techniques. The beauty of using recycled items lies in the unique acoustic properties each material offers, creating a diverse soundscape that encourages musical exploration and sensory development.
These installations serve multiple purposes beyond simple entertainment. They promote gross motor skill development as children reach, stretch, and move while playing. The variety of sounds helps develop auditory discrimination skills, teaching young musicians to identify different tones, pitches, and timbres. Additionally, outdoor music walls encourage creative expression, allowing children to compose their own rhythms and melodies in an unstructured environment.
Planning Your Permanent Music Wall
Location Selection
The first critical decision involves choosing the right location for your permanent music wall. Consider areas that receive partial shade to protect both the instruments and users from intense sun exposure. Avoid locations directly under trees where falling branches, sap, or excessive debris could damage the installation. The wall should be positioned away from property lines to minimize noise concerns with neighbors, while remaining visible from indoor spaces for supervision purposes.
Ensure the chosen location has proper drainage to prevent water pooling around the base structure. If installing near an existing fence, verify that the fence posts are sturdy enough to support additional weight. For freestanding installations, select level ground that allows for secure post installation and stable footing.
Design Considerations
When designing your permanent music wall, consider the height range of primary users. Position lower-sounding instruments at child height, typically between 24 to 48 inches from the ground. Create visual interest by arranging items at varying heights and angles, which also produces different acoustic effects. Plan for adequate spacing between instruments, allowing approximately 8 to 12 inches between each item to prevent overcrowding and enable comfortable play.
Think about the overall aesthetic alongside functionality. Group similar materials together for a cohesive look, or create an eclectic arrangement that showcases the diversity of recycled items. Consider incorporating a color theme by selecting items in complementary colors or painting certain pieces to create visual harmony.
Essential Recycled Materials for Your Music Wall
Metal Items
Metal objects produce the most resonant and varied sounds, making them ideal for outdoor music walls. Kitchen pots and pans are popular choices, with stainless steel offering bright, crisp tones while cast iron produces deeper, more mellow sounds. Different sizes create distinct pitches, allowing you to arrange them in a scale-like pattern. Old baking sheets, muffin tins, and cooling racks provide flat surfaces that produce sharp, percussive sounds when struck.
Recycled metal buckets, paint cans, and coffee tins offer excellent drum-like qualities. Remove any paper labels and ensure all sharp edges are filed smooth or covered with weather-resistant tape. Empty food cans in various sizes can be grouped together to create a makeshift xylophone effect, with smaller cans producing higher pitches than larger ones.
Old metal utensils such as colanders, whisks, and slotted spoons create unique textures and sounds. Colanders are particularly interesting as they can be played by running sticks across the holes or tapping directly. Bundt cake pans and tube pans offer interesting shapes with hollow centers that produce distinctive tones.
Plastic and PVC Materials
PVC pipes offer remarkable versatility for outdoor music walls. Cut them into varying lengths to produce different pitches, with longer pipes creating deeper notes and shorter ones producing higher tones. The standard formula suggests that doubling the length lowers the pitch by one octave. Drill small holes near the top for hanging, and cap one end to enhance resonance.
Plastic buckets, flowerpots, and containers provide durable, lightweight options that withstand weather exposure excellently. Terracotta flower pots create pleasant, bell-like tones, while plastic pots produce softer, more muted sounds. Varying the pot sizes allows you to create a melodic range similar to tubular bells.
Wood Components
Wooden items add warmth and natural acoustic properties to your music wall. Old cutting boards, wooden spoons attached at angles, and small wooden boxes create satisfying percussive sounds. Bamboo pieces, whether from old blinds or garden stakes, produce light, resonant tones. Wooden items require more maintenance than metal or plastic but offer unique tonal qualities worth the extra care.
Glass and Ceramic
While more fragile, glass and ceramic items create beautiful, crystalline sounds. Empty wine bottles with corks removed can be hung horizontally or vertically, producing different pitches when tapped. Ceramic mugs, bowls, and plates add variety to the soundscape. Exercise caution with these materials, ensuring they are securely mounted and positioned where they’re less likely to be struck with excessive force. Consider using these items in upper sections of the wall, away from younger children.
Building the Wall Structure
Freestanding Frame Construction
For a permanent freestanding music wall, construct a sturdy frame using pressure-treated lumber rated for ground contact. Use 4×4 posts for the vertical supports, setting them at least 24 inches deep in concrete for stability. Space posts 4 to 6 feet apart, depending on your desired wall width. Connect posts with 2×4 horizontal beams at top, middle, and bottom, creating a grid structure that provides multiple attachment points.
Reinforce corners with metal brackets and use galvanized or stainless steel hardware throughout to prevent rust. Consider angling the posts slightly backward (about 5 degrees) to create a more stable structure that leans away from users. This slight angle also helps with water runoff during rain.
Fence-Mounted Installation
If attaching your music wall to an existing fence, first assess the fence’s structural integrity. Wooden privacy fences work well, providing solid backing for mounting instruments. Ensure fence posts are stable and not rotting at the base. You may need to add additional horizontal support beams between fence posts to distribute weight evenly.
For chain-link fences, attach a backing board first, such as a sheet of exterior-grade plywood or composite decking board. Secure this backing to fence posts using heavy-duty zip ties or galvanized wire at multiple points. This creates a solid surface for mounting instruments while maintaining fence integrity.
Alternative Structures
Repurposed items can serve as excellent music wall bases. Old wooden pallets provide ready-made structures with built-in spacing for hanging instruments. Treat pallets with weather-resistant sealant and mount them vertically, either freestanding with support legs or attached to existing structures. Vintage headboards, old doors, or salvaged fence panels offer unique, characterful backings that add visual interest while providing practical mounting surfaces.
Weatherproofing and Preparation
Metal Treatment
Prepare metal items for permanent outdoor exposure by first removing any rust with steel wool or a wire brush. Clean thoroughly with soapy water and allow to dry completely. Apply a rust-inhibiting primer designed for metal surfaces, followed by two coats of exterior-grade metal paint or spray paint. Choose colors that complement your outdoor space or create visual interest through contrasting hues.
For items you wish to maintain in their natural metal state, apply a clear, waterproof sealant specifically designed for outdoor metal. Reapply sealant annually to maintain protection. Stainless steel items require less preparation but benefit from periodic cleaning to prevent water spots and maintain appearance.
Wood Protection
All wooden components require thorough weatherproofing for permanent installations. Sand rough surfaces smooth to prevent splinters, then apply a wood preservative to protect against moisture, insects, and decay. Follow with multiple coats of exterior-grade polyurethane, marine varnish, or outdoor wood stain with built-in sealant. Pay special attention to end grains, which absorb moisture readily, applying extra coats to these areas.
For the main structural frame, use pressure-treated lumber pre-treated with preservatives. Even treated wood benefits from additional sealing, particularly at cut ends and joints where moisture can penetrate.
Plastic and PVC Care
Plastic items require minimal weatherproofing but benefit from UV-resistant treatments. Apply a UV-protective spray designed for plastics to prevent fading and brittleness from sun exposure. Clean plastic items with mild detergent before installation to ensure good adhesion of any coatings or treatments.
Installation and Mounting Techniques
Hanging Methods
Select hanging hardware based on item weight and exposure. Heavy-duty stainless steel or galvanized eye bolts screwed directly into structural beams provide secure mounting points for heavier items. For lighter objects, use outdoor-rated cup hooks or S-hooks. Marine-grade rope, stainless steel cable, or galvanized chain work well for suspension, offering durability in outdoor conditions.
Create hanging points by drilling holes through items that lack natural attachment points. Use a drill bit appropriate for the material, working slowly to prevent cracking. For metal items, start with a small pilot hole before enlarging to the desired size. Smooth any sharp edges with a file or sandpaper.
When using rope or cord for hanging, opt for materials specifically rated for outdoor use. Nylon rope, paracord, or marine-grade line resist moisture and UV damage. Avoid natural fiber ropes, which deteriorate quickly outdoors. For fishing line, which some temporary installations use, upgrade to stainless steel wire or cable for permanent installations, as fishing line degrades under prolonged UV exposure.
Direct Mounting
Some items benefit from being mounted directly to the wall structure rather than hanging. Use outdoor-rated screws or bolts, drilling pilot holes first to prevent wood splitting. For items with handles, such as pots and pans, insert screws through handle holes, leaving enough space for the item to resonate when struck. Mounting items at slight angles creates interesting visual effects and varied sound qualities.
For flat items like baking sheets or cutting boards, mount using spacers such as washers or small blocks of wood to create air space behind the item. This air gap allows proper vibration and sound resonance. Without it, sounds become muted and less interesting.
Adjustable Systems
Consider incorporating adjustable mounting systems that allow you to change instrument positions or swap items seasonally. Install a series of eye hooks at regular intervals across horizontal beams, creating a grid system. This flexibility allows you to experiment with different arrangements and replace worn items easily without reconstruction.
Creating Mallets and Playing Implements
Provide various playing tools to expand the range of sounds your music wall produces. Wooden spoons offer classic drumstick functionality with a gentler strike than commercial drumsticks. Paint them bright colors and attach them to the wall with rope or chain so they don’t get lost. Metal whisks create interesting scraping sounds when dragged across textured surfaces like colanders or cooling racks.
Create padded mallets by wrapping wooden spoon handles with felt, fabric, or foam, secured with waterproof glue and outdoor-rated zip ties. These softer mallets produce mellower tones and are gentler on instruments, extending their lifespan. For xylophone-style instruments like PVC pipes, rubber mallets work exceptionally well.
Install a storage solution for playing implements directly on or near the music wall. A simple weatherproof bucket, a series of hooks, or a repurposed utensil holder mounted to the structure keeps mallets organized and accessible. Choose storage options with drainage holes to prevent water accumulation.
Enhancing Your Music Wall
Adding Visual Elements
While sound is the primary focus, visual appeal enhances the overall experience. Paint wooden backing boards in cheerful colors or patterns. Apply weather-resistant chalkboard paint to sections of the wall, allowing children to draw musical notes or create visual representations of the sounds they make. Incorporate colorful weather-resistant fabric strips or ribbons that flutter in the breeze, adding movement and visual interest.
Sound Variety Expansion
Include instruments that produce sounds through mechanisms other than striking. Add old bicycle bells for ringing, install wind chimes that complement the percussion instruments, or mount corrugated metal sections that create unique sounds when scraped. Consider adding a section with moveable parts, such as a small weatherproof xylophone or a series of bells arranged by pitch.
Educational Components
Transform your music wall into an educational tool by adding weather-resistant labels identifying different types of sounds or instruments. Create simple musical notation guides laminated for outdoor use, showing basic rhythms children can attempt. Include informational signs explaining concepts like pitch, volume, and rhythm in age-appropriate language.
Maintenance and Seasonal Care
Regular Maintenance Schedule
Perform monthly inspections of your permanent music wall to ensure all components remain secure and safe. Check mounting hardware for looseness, rust, or damage. Tighten any loose screws or bolts, and replace corroded hardware promptly. Clean instruments with appropriate cleaners for their materials, removing dirt, pollen, and debris that accumulate outdoors.
Apply protective coatings annually, refreshing paint, sealant, or weatherproofing treatments before weather extremes. Spring preparation before summer sun and fall preparation before winter weather help extend the life of all components. Pay particular attention to wooden elements, which require more frequent maintenance than metal or plastic.
Winter Protection
Even permanent installations benefit from winter protection in harsh climates. Remove the most delicate or vulnerable items, such as glass bottles or ceramic pieces, storing them indoors until spring. Cover remaining instruments with weather-resistant tarps or fabric during extended periods of non-use, particularly during heavy snow or ice events. This protection prevents snow and ice accumulation that can strain mounting systems.
Apply a fresh coat of rust-inhibiting spray to metal items before winter, as moisture from snow and ice accelerates corrosion. Check and retighten all hardware after winter weather events, as freeze-thaw cycles can loosen connections.
Summer Care
During summer months, monitor for sun damage, particularly fading of painted surfaces and deterioration of plastic components. Provide shade using a pergola structure, shade cloth, or strategic positioning near trees or buildings. However, avoid complete shade coverage, as some sun exposure helps prevent mold and mildew growth on wooden components.
Safety Considerations
Safety must remain paramount in permanent outdoor music wall construction. Ensure all edges are smooth and free from sharp points or burrs that could cause cuts or scrapes. Check instruments regularly for cracks or breaks that could create hazards. Install the music wall on a soft surface like grass, mulch, or rubber playground matting to cushion potential falls.
Verify that all mounting systems can withstand the force of enthusiastic play. Test each instrument by striking it firmly multiple times during installation to ensure secure attachment. For taller installations, ensure top-heavy items are mounted securely to prevent tipping. Consider adding a small fence or border around freestanding installations to prevent children from accessing the back of the structure where hardware is exposed.
Regularly inspect for signs of wear, such as fraying rope, cracking plastic, or splitting wood. Replace compromised components immediately rather than waiting for scheduled maintenance. Establish clear rules for appropriate use, such as striking with mallets only rather than throwing objects at the wall.
Cost-Effective Sourcing Strategies
Building a permanent outdoor music wall from recycled items can be remarkably budget-friendly with strategic sourcing. Begin by inventorying your own home for unused pots, pans, and kitchen items. Check basements, garages, and storage areas for forgotten treasures. Ask friends and family if they have items they’re planning to discard.
Visit thrift stores, yard sales, and estate sales where kitchen items and miscellaneous metal objects sell for minimal prices. Many thrift stores offer discount days when items are further reduced. Online marketplaces and community sharing groups often feature free items, especially during spring cleaning season when people declutter.
For structural lumber and hardware, check with local construction sites or renovation projects for scrap materials. Many contractors are happy to give away leftover wood rather than paying disposal fees. Habitat for Humanity ReStores offer new and gently used building materials at significant discounts.
Advanced Design Ideas
Themed Music Walls
Consider creating themed sections within your music wall. A “kitchen band” area features only cookware and utensils. A “nature sounds” section incorporates bamboo, wooden items, and ceramic pieces that mimic natural acoustic environments. A “junkyard percussion” area showcases industrial salvage items like old gears, metal brackets, or automotive parts that produce unique sounds.
Interactive Elements
Incorporate elements that respond to forces beyond direct striking. Install a section with items hung at varying heights and proximity, creating a domino effect where striking one instrument causes it to swing into another. Add a “rain chain” style element where water flows through a series of containers during rainfall, creating natural music. Include moveable parts that allow children to adjust instrument positions themselves, fostering ownership and creative experimentation.
Musical Learning Integration
Arrange certain instruments in specific patterns to teach musical concepts. Group PVC pipes cut to precise lengths that correspond to major scale notes, labeled with note names. Create a section demonstrating the relationship between size and pitch by arranging similar items in gradual size progression. Include a rhythm station with visual patterns showing simple beats to replicate.
Frequently Asked Questions
Q: How long will a permanent outdoor music wall last?
A: With proper weatherproofing and maintenance, a well-constructed permanent outdoor music wall can last 5 to 10 years or longer. Metal components typically last longest, while wooden elements require more frequent replacement or refinishing. Regular maintenance and seasonal protection significantly extend lifespan.
Q: Will the music wall disturb neighbors?
A: Outdoor music walls produce moderate noise levels similar to children playing actively. Position the wall away from property lines and establish quiet hours for use. Most neighbors tolerate daytime musical play, especially when children are clearly engaged in creative, active outdoor play. Consider your neighborhood dynamics and discuss plans with adjacent neighbors beforehand.
Q: Can I build a music wall without carpentry skills?
A: Absolutely. The simplest approach involves attaching instruments directly to an existing fence using hooks and rope, requiring only basic tools like a drill and screwdriver. Pre-made structures like pallets offer ready-to-use frameworks. Start with a small, simple installation and expand as you gain confidence.
Q: What’s the best height for a children’s music wall?
A: For preschool-aged children, position instruments between 24 and 48 inches from the ground. For mixed-age groups, create multiple levels with lower instruments for toddlers and higher installations for older children and adults. Ensure the lowest hanging items clear the ground by at least 12 inches to prevent tripping hazards.
Q: How do I prevent rust on metal instruments?
A: Apply rust-inhibiting primer and exterior metal paint before installation. Stainless steel items resist rust naturally. For unpainted items, use clear outdoor metal sealant and reapply annually. Regularly wipe items dry after rain and inspect monthly for early rust signs, addressing any spots immediately with rust converter and fresh paint.
Q: Are there items I should avoid using?
A: Avoid items with sharp edges that cannot be adequately smoothed or covered. Glass items, while sonically interesting, pose breakage risks and should be used sparingly and positioned carefully. Avoid painted items with lead-based paint, particularly vintage cookware. Skip items with small detachable parts that pose choking hazards for young children.
Q: Can I include purchased musical instruments?
A: Yes, combine recycled items with inexpensive purchased instruments designed for outdoor use. Dollar store tambourines, thrift store xylophones, or hardware store chimes complement recycled elements nicely. This combination expands tonal variety while maintaining the eco-friendly spirit of the project.
Q: How do I arrange instruments for the best sound?
A: Group similar materials together for cohesive sound zones, or alternate materials for maximum variety. Arrange items from high to low pitch horizontally, mimicking a musical scale. Place louder, more resonant items like large pots at edges, with quieter items in the center. Experiment with positioning, as small adjustments significantly affect acoustics.
Conclusion
Building a permanent outdoor music wall from recycled items creates a sustainable, engaging, and educational addition to any backyard. This project combines creativity, environmental consciousness, and musical exploration while providing countless hours of entertainment. By carefully selecting materials, properly weatherproofing components, and maintaining the installation regularly, you create a lasting musical playground that encourages children to explore sound, rhythm, and creative expression in the fresh air. The beauty of this project lies not only in its functionality but in its unique character—each music wall tells a story through its collection of repurposed items, creating a one-of-a-kind instrument that reflects your family’s creativity and commitment to sustainable living. Start small if needed, building confidence and skills as you expand your musical creation into the backyard centerpiece it deserves to be.
References
- https://www.andnextcomesl.com/2014/06/diy-recycled-outdoor-music-station.html
- https://www.greenkidcrafts.com/kids-music-wall/
- https://www.easternjunglegym.com/how-to-build-an-outdoor-diy-music-wall-for-your-toddler
- https://www.prekprintablefun.com/blog/outdoor-music-walls
- http://prekandksharing.blogspot.com/2012/07/make-music-wall.html
- https://www.funathomewithkids.com/2013/06/backyard-design-diy-outdoor-sound.html?m=0